image source: https://www.vrogue.co
Are you wondering how to take a screenshot? Look no further! In this guide, we will walk you through the step-by-step process of capturing screenshots on your device, including iOS, Android, and computers. Taking screenshots can be a useful tool for capturing important information or sharing a moment with others. By following our simple instructions, you’ll be a pro at taking screenshots in no time. Let’s dive in and learn how to take a screenshot.
Step-by-Step Guide: How to Take a Screenshot Like a Pro
Taking a screenshot is a useful and simple way to capture an image on your computer or mobile device screen. Whether you want to save a webpage for future reference, show a technical issue to a support team, or share a funny conversation with your friends, knowing how to take a screenshot like a pro is a valuable skill. In this step-by-step guide, we will show you how to take a screenshot on different devices and provide some tips to make your screenshots look polished and professional.
Step 1: Identify the type of device you are using
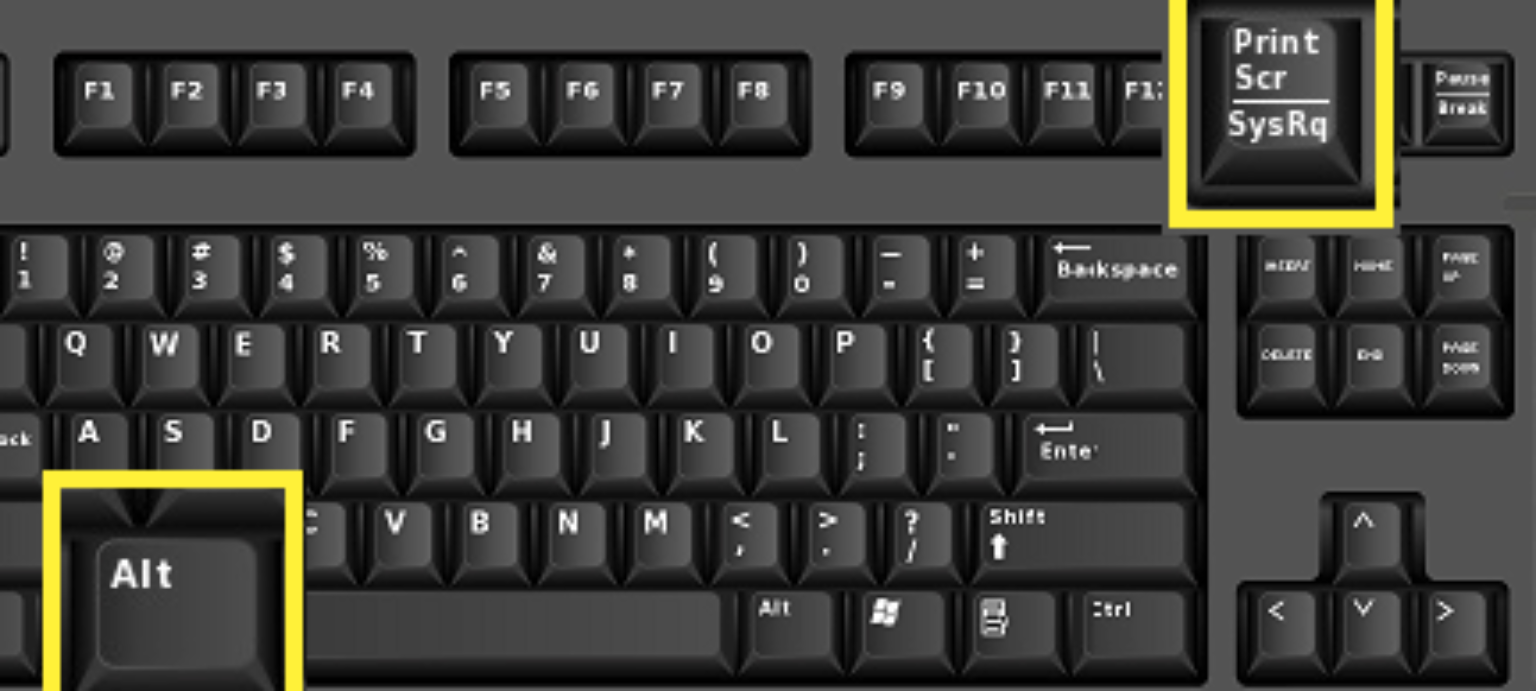
The first step to taking a screenshot is to identify the type of device you are using. This will determine the specific key or combination of keys you need to press to take a screenshot. For example, on a Windows computer, you typically use the Print Screen (PrtScn) key, while on a Mac, you use a combination of keys, such as Command + Shift + 4. On a mobile device, the process may involve pressing a combination of buttons, such as the power button and the volume down button. Once you know the type of device you are using, you can proceed to the next step.
Step 2: Find the right keys
Now that you know the type of device you are using, you need to locate the correct keys to take a screenshot. These keys are often located at the top of your keyboard, and they may have a camera icon or say “PrtScn” or “Print Screen.” On a Mac, the keys may have a camera icon or say “Cmd” and “Shift.” On a mobile device, the keys may be on the side or bottom of the device. If you are unsure, you can refer to the device’s manual or do a quick online search for the specific model.
Step 3: Take the screenshot
Once you have located the correct keys, it’s time to take the screenshot. On a Windows computer, simply press the PrtScn key. On a Mac, press the Command + Shift + 4 keys, then use your cursor to select the area you want to capture. On a mobile device, press the designated buttons simultaneously. You may hear a camera shutter sound or see a flash on your screen, indicating that the screenshot has been taken.
Step 4: Save the screenshot
After taking the screenshot, it is automatically saved to your device’s clipboard or camera roll. To access it on a Windows computer, open the Paint program and press Ctrl + V or right-click and select “Paste,” then save the image. On a Mac, the screenshot will appear as a file on your desktop. On a mobile device, you can access your screenshots in the Photos app.
Step 5: Edit and enhance the screenshot (optional)
If you want to make your screenshot stand out, you can edit and enhance it using various tools and software. Most devices have built-in editing tools that allow you to crop, annotate, and add text to your screenshots. You can also use third-party software like Adobe Photoshop or Canva for more advanced editing options.
Tips for taking professional screenshots
– Before taking a screenshot, make sure the screen is clutter-free and any sensitive information is blurred or cropped out.
– Use the appropriate key combination to capture the entire screen or a specific area as needed.
– Experiment with different angles and lighting to capture the best quality screenshot.
– If you are taking a screenshot of a webpage, make sure to zoom in for
Mastering the Art of Taking Screenshots: Tips and Tricks
Screenshots are a useful tool for capturing and sharing visual information on a computer or mobile device. Whether you are trying to show a step-by-step process, highlight a specific detail, or simply save a moment in time, mastering the art of taking screenshots can make your work more efficient and effective. In this guide, we will discuss some tips and tricks for taking high-quality screenshots.
1. Know your device’s screenshot function
Before taking a screenshot, it is important to know the specific function for your device. On a Windows computer, you can press the “PrtScn” button on your keyboard to capture the entire screen, or use the “Alt + PrtScn” combination to capture just the active window. On a Mac, you can use the “Command + Shift + 3” combination to capture the entire screen or “Command + Shift + 4” to select a specific area. Mobile devices also have their own screenshot functions, usually involving a combination of buttons or gestures. Familiarize yourself with these functions to make the process easier.
2. Use editing tools
Taking a screenshot is just the first step, but you may also need to edit it before sharing. Most devices have built-in editing tools that allow you to crop, annotate, or add text to your screenshot. These tools can be useful for highlighting important information or blurring out sensitive details. If your device does not have built-in editing tools, you can use third-party software such as Adobe Photoshop or Microsoft Paint.
3. Consider using a third-party extension or app
If you frequently take screenshots, you may want to consider using a third-party extension or app. These tools often have more advanced editing features and can make the process faster and more convenient. Some popular options include Lightshot, Greenshot, and Snagit.
4. Use the right file format
When saving your screenshot, it is important to choose the right file format. For most purposes, a JPEG or PNG file will suffice. However, if you are capturing an image with text or graphics, using a PNG file will preserve the image’s quality without sacrificing clarity.
5. Use natural lighting
If you are taking a screenshot of a physical object, such as a product or document, it is best to use natural lighting for the photo. This will result in better color accuracy and reduce glare or reflections. Avoid using flash or artificial lighting, as this can distort the colors and make the image appear washed out.
6. Use the rule of thirds
The rule of thirds is a composition technique used in photography and can also be applied to screenshots. It involves dividing the image into thirds both horizontally and vertically, creating a grid of nine equal parts. Placing the subject of your screenshot at one of the intersections or along the lines can make the image more visually appealing.
7. Clean up your desktop
If you are taking a screenshot of your computer screen, it is important to clean up your desktop before capturing the image. This will avoid any distractions or clutter in the background and make the screenshot look more professional.
8. Use keyboard shortcuts
As mentioned earlier, most devices have keyboard shortcuts for taking screenshots. These can be a time-saver, especially if you need to take multiple screenshots. You can also customize these shortcuts on some devices to better suit your needs.
9. Experiment with different angles and perspectives
Don’t be afraid to experiment with different angles and perspectives when taking screenshots. This can add visual interest and make the
Capture Your Screen in Seconds: The Ultimate Guide to Taking Screenshots
Screenshots are a handy way to capture images of your computer or mobile device screen. Whether you want to save a certain moment in a video, document a software issue, or share a funny conversation with friends, screenshots are an efficient and convenient option. In this guide, we will provide you with all the necessary information to take screenshots on different devices and operating systems.
First, let’s start with the basics. A screenshot, also known as a screen capture or screencap, is a digital image of whatever is displayed on your screen at a given time. It can include your desktop background, open windows, and any active content. Screenshots are widely used for various purposes, including troubleshooting, sharing information, and creating visual content.
Now, let’s dive into the methods for taking screenshots on different devices. We will cover desktops, laptops, smartphones, and tablets.
Taking Screenshots on a Desktop or Laptop:
1. Windows: On a Windows computer, you can take a screenshot by pressing the “PrtScn” button on your keyboard. This will capture the entire screen and save it to your clipboard. You can then paste the screenshot into an image editing program, like Paint, and save it as a file.
2. Mac: On a Mac, you can take a screenshot by pressing “Command + Shift + 3” to capture the entire screen. If you want to capture a specific area, press “Command + Shift + 4” and select the desired area. The screenshot will be saved to your desktop.
3. Chromebook: To take a screenshot on a Chromebook, press “Ctrl + Show Windows” keys. The screenshot will be saved to your downloads folder.
Taking Screenshots on a Smartphone or Tablet:
1. iOS: On an iPhone or iPad, press the “Sleep/Wake” button and the “Home” button at the same time to take a screenshot. The screenshot will be saved to your camera roll.
2. Android: On most Android devices, press the “Power” button and the “Volume Down” button simultaneously to take a screenshot. The screenshot will be saved to your photos.
3. Samsung: On a Samsung device, press the “Power” button and the “Home” button at the same time to take a screenshot. The screenshot will be saved to your gallery.
Now that you know how to take screenshots on different devices, let’s explore some additional tips and tricks to enhance your screenshot experience.
1. Use editing tools: Most devices have built-in editing tools that allow you to crop, annotate, and add text to your screenshots. This can be helpful when you want to highlight a specific area or add context to your screenshot.
2. Use third-party apps: There are also many third-party apps available for both desktop and mobile devices that offer advanced editing features and allow you to easily share your screenshots.
3. Use keyboard shortcuts: Many devices have specific keyboard shortcuts for different types of screenshots. Familiarize yourself with these shortcuts to save time and improve your efficiency.
4. Consider the file format: Screenshots are usually saved as PNG files, but you can also change the file format to JPEG or GIF depending on your needs. Keep in mind that changing the format may affect the quality of the image.
5. Organize your screenshots: It’s easy to accumulate a large number of screenshots, so it’s important to organize them in a way that makes them easily accessible. Consider creating folders or using appsIn conclusion, learning how to take a screenshot is a useful skill to have in this digital age. By following the simple steps outlined above, you can easily capture and save important information or moments on your device. With the increasing need for visual communication, knowing how to take a screenshot can also enhance your online presence and improve your SEO efforts. So, don’t hesitate to utilize this handy tool and elevate your digital experience. Remember, practice makes perfect!
Reference
- How to take a full-page screenshot on iPhone, https://appleinsider.com/inside/iphone/tips/how-to-take-a-full-page-screenshot-on-iphone
- Amazon’s ‘ZenBooths’ a ‘slap in the face’ to stressed warehouse workers told to think happy thoughts, https://nypost.com/2024/03/13/business/amazon-workers-told-to-close-your-eyes-and-think-happy-thoughts/
- WhatsApp introduces new privacy measure by blocking profile picture screenshots, https://www.jpost.com/business-and-innovation/article-791827
- Hulu series ‘Life & Beth’ paints getting an abortion as ‘just like taking a nap’, https://www.christianpost.com/news/hulu-series-insists-abortion-procedure-is-just-like-taking-a-nap.html
