Welcome to our guide on how to screenshot on Mac. Taking a screenshot on your Mac can be a useful tool for capturing and sharing important information or memorable moments. Whether you’re a student, professional, or simply looking to capture a funny meme, knowing how to screenshot on Mac is a valuable skill. In this guide, we will walk you through the different methods of taking screenshots on Mac and provide tips for optimizing your screenshots for SEO. Let’s dive in and learn how to make the most out of your Mac’s screenshot capabilities.
Mastering the Art of Screenshotting on Mac: A Beginner’s Guide”
Screenshots are an essential tool for capturing and sharing information on your Mac. Whether you need to save an error message for tech support, document a step-by-step process, or simply want to showcase a beautiful design, mastering the art of screenshotting is a valuable skill for any Mac user. In this beginner’s guide, we will walk you through the different methods for taking screenshots on your Mac and provide tips for getting the perfect shot every time.
1. Understanding the Different Types of Screenshots
Before we dive into the methods for taking screenshots, it’s important to understand the different types of screenshots that can be captured on a Mac. There are three main types: full screen, selected window, and selected area.
– Full screen: This type of screenshot captures the entire screen, including the menu bar and any open windows or applications.
– Selected window: A selected window screenshot captures only the active window or application. This is useful when you want to focus on a specific element without including the rest of the screen.
– Selected area: This type of screenshot allows you to select a specific area on your screen to capture. This is great for capturing a specific section of a website or document.
2. Using Keyboard Shortcuts
The quickest and most convenient way to take a screenshot on a Mac is by using keyboard shortcuts. There are three main shortcuts for taking screenshots:
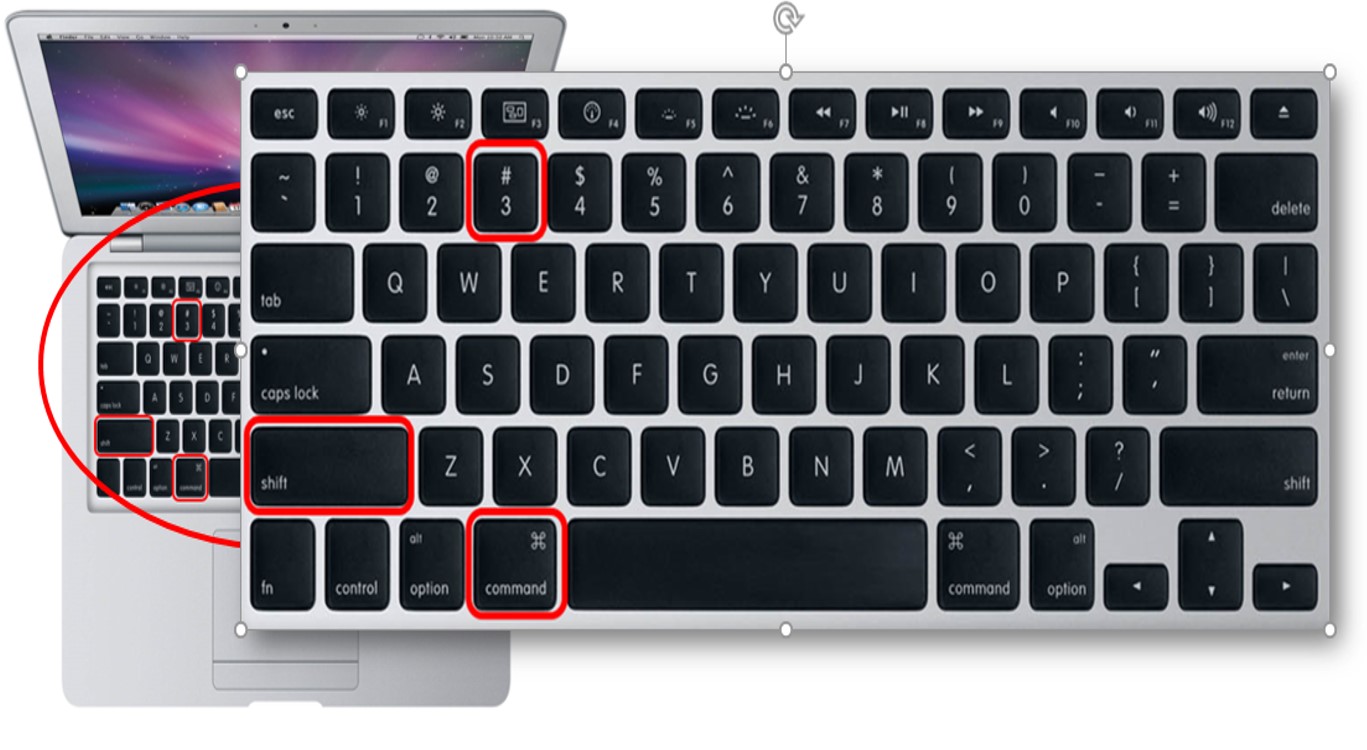
– Command + Shift + 3: This captures a full screen screenshot and saves it to your desktop.
– Command + Shift + 4: This turns your cursor into a crosshair, allowing you to select a specific area to capture. Once you release the click, the screenshot will be saved to your desktop.
– Command + Shift + 4 + Spacebar: This shortcut allows you to capture a specific window or application. After pressing this combination, your cursor will turn into a camera icon. Simply click on the window or application you want to capture, and it will be saved to your desktop.
3. Using the Screenshot App
If you prefer a more visual approach to taking screenshots, you can use the built-in Screenshot app on your Mac. To access this app, simply press Command + Shift + 5. This will bring up a menu at the bottom of your screen with options for capturing different types of screenshots, as well as options for recording your screen.
4. Customizing Screenshot Settings
You can customize the settings for screenshots in the Screenshot app by clicking on the Options button. This will allow you to change the default save location, file format, and other options. You can also access these settings by going to System Preferences > Keyboard > Shortcuts > Screenshots.
5. Editing Screenshots
After taking a screenshot, you may want to make some edits before sharing it. Macs come with a built-in image editor called Preview, which allows you to crop, resize, and make other edits to your screenshots. Simply open the screenshot in Preview and use the tools in the toolbar to make your desired edits.
6. Using Third-Party Apps
If you want even more options for editing and organizing your screenshots, there are several third-party apps available for Mac users. Some popular options include Snagit, Skitch, and Lightshot.
7. Sharing Screenshots
Once you have captured and edited your screenshot, you can easily share it with others. You can either drag and drop the screenshot into an email or document, or you can use the Share button in the Preview app to
Step-by-Step Tutorial: How to Screenshot on Mac in Seconds”
Capturing screenshots on a Mac is a simple and useful tool for a variety of purposes, whether it’s for work, school, or personal use. Screenshots allow you to capture an image of your screen and save it as a file for later use. In this step-by-step tutorial, we will guide you through the process of taking a screenshot on your Mac in just a few seconds.
Step 1: Determine the type of screenshot you want to take
Before taking a screenshot, it’s important to decide what type of screenshot you need. Do you want to capture your entire screen or just a portion of it? Do you want to capture a specific window or the entire desktop? Knowing what you want to capture will make the process much easier.
Step 2: Use the keyboard shortcuts
Mac computers have a built-in shortcut for taking screenshots. To capture the entire screen, press the Command (⌘) + Shift + 3 keys at the same time. This will capture your entire screen and save it as a file on your desktop.
If you want to capture a specific portion of your screen, press the Command (⌘) + Shift + 4 keys. This will change your cursor to a crosshair, allowing you to select the area you want to capture by clicking and dragging.
Step 3: Capture a specific window
To capture a specific window, press the Command (⌘) + Shift + 4 keys, then press the Spacebar. Your cursor will change to a camera, and you can click on the window you want to capture. This will capture the window and save it as a file on your desktop.
Step 4: Use the Preview app
If you don’t want to use keyboard shortcuts, you can also take a screenshot using the Preview app. Open the app and go to File > Take Screenshot. You will have the option to capture a selection, window, or the entire screen.
Step 5: Edit and save your screenshot
Once you have taken your screenshot, it will appear as a file on your desktop. You can then edit it using the Preview app or any other image editing software. To save the screenshot, simply click on the file and press Command (⌘) + S. You can choose where to save it and in what format.
Step 6: Use third-party apps
If you take a lot of screenshots and want more advanced features, you can also use third-party apps such as Skitch or Snagit. These apps offer additional editing options and make it easier to organize and share your screenshots.
Congratulations, you now know how to take a screenshot on your Mac in just a few seconds. Whether it’s for work, school, or personal use, capturing screenshots on your Mac is a handy tool that can make your life a lot easier. With these simple steps, you can easily capture and save any information you need from your screen.
Maximizing Efficiency: The Ultimate Guide to Screenshotting on Mac
Screenshots are an essential part of using a Mac. Whether you need to capture a moment on your screen for documentation purposes or you want to share a specific image with others, knowing how to efficiently take and manage screenshots on your Mac can save you time and frustration. In this guide, we will explore the various methods for taking screenshots on a Mac and provide tips for maximizing efficiency.
Method 1: Using Keyboard Shortcuts
The quickest and most convenient way to take a screenshot on a Mac is by using keyboard shortcuts. These are pre-set combinations of keys that trigger the screenshot function. The most common keyboard shortcuts for taking screenshots on a Mac are:
• Command + Shift + 3: This captures the entire screen and saves it as a file on your desktop.
• Command + Shift + 4: This turns your cursor into a crosshair, allowing you to select a specific area of the screen to capture. Once you have selected the area, release the keys to take the screenshot.
• Command + Shift + 4 + Spacebar: This turns your cursor into a camera icon, allowing you to capture a specific window or menu. Simply click on the window or menu to take the screenshot.
• Command + Control + Shift + 3: This captures the entire screen and copies it to your clipboard so you can paste it into another application.
• Command + Control + Shift + 4: This captures a specific area and copies it to your clipboard.
Method 2: Using the Screenshot App
Mac also has a built-in Screenshot app that offers more advanced features for taking and managing screenshots. To access this app, go to Applications > Utilities > Screenshot. Some of the features of this app include:
• Options for capturing the entire screen, a selected area, or a specific window or menu.
• The ability to set a timer for taking a screenshot.
• The option to choose where to save the screenshot.
• Instant preview of the screenshot before saving.
• Basic editing tools such as cropping, rotating, and annotating.
Method 3: Using Third-Party Apps
If you need more advanced features for your screenshots, there are various third-party apps available for Mac. These apps offer additional options like capturing scrolling screenshots, capturing videos, and organizing your screenshots in folders. Some popular third-party apps for Mac include Snagit, Lightshot, and Monosnap.
Tips for Maximizing Efficiency
Now that you know the different methods for taking screenshots on your Mac, here are some tips to help you maximize efficiency:
1. Customize keyboard shortcuts: If the default keyboard shortcuts do not work for you, you can customize them by going to System Preferences > Keyboard > Shortcuts > Screenshots.
2. Use the Preview app: The Preview app on Mac allows you to view and edit your screenshots. You can annotate, crop, and resize your screenshots before saving them.
3. Utilize the screenshot toolbar: When you take a screenshot, a small thumbnail of it appears in the bottom right corner of your screen. Clicking on this thumbnail opens the screenshot toolbar, which provides quick options for editing and sharing your screenshot.
4. Use the Markup feature: With the Markup feature, you can quickly add annotations, text, and shapes to your screenshots without having to open another app.
5. Organize your screenshots: It is important to regularly organize your screenshots to avoid clutter. Create folders and label them according to the type of screenshots you take, such as work, personalIn conclusion, knowing how to screenshot on Mac is an essential skill for effectively capturing and sharing images on your device. By following the steps outlined above, you can easily take screenshots and enhance your productivity. Whether for work or personal use, mastering this feature will make your Mac experience more seamless and efficient. So next time you need to capture a moment or save important information, remember these simple instructions to take a screenshot on your Mac. Keep exploring and utilizing the various features of your device to make the most out of your Mac experience.
