Welcome to our guide on how to deactivate your Facebook account. Whether you’re taking a break from social media or simply want to permanently delete your account, we’ll walk you through the steps to deactivate your account in a few simple steps. By following our instructions, you’ll be able to deactivate your Facebook account in a way that is both easy and SEO-friendly. So let’s get started and learn how to deactivate Facebook account.
Step-by-Step Guide: How to Deactivate Your Facebook Account
Deactivating your Facebook account may seem like a big step, but it can be a helpful way to take a break from social media or protect your privacy. Deactivating your account means that your profile and all of your information will be temporarily hidden from other users, but you can reactivate it at any time by simply logging back in. If you’re ready to deactivate your Facebook account, here’s a step-by-step guide to help you through the process.
Step 1: Log in to your Facebook account
The first step to deactivating your Facebook account is to log in to your profile. Make sure you’re using a computer or mobile device that has internet access and open your preferred web browser. Then, go to www.facebook.com and enter your email address and password to log in.
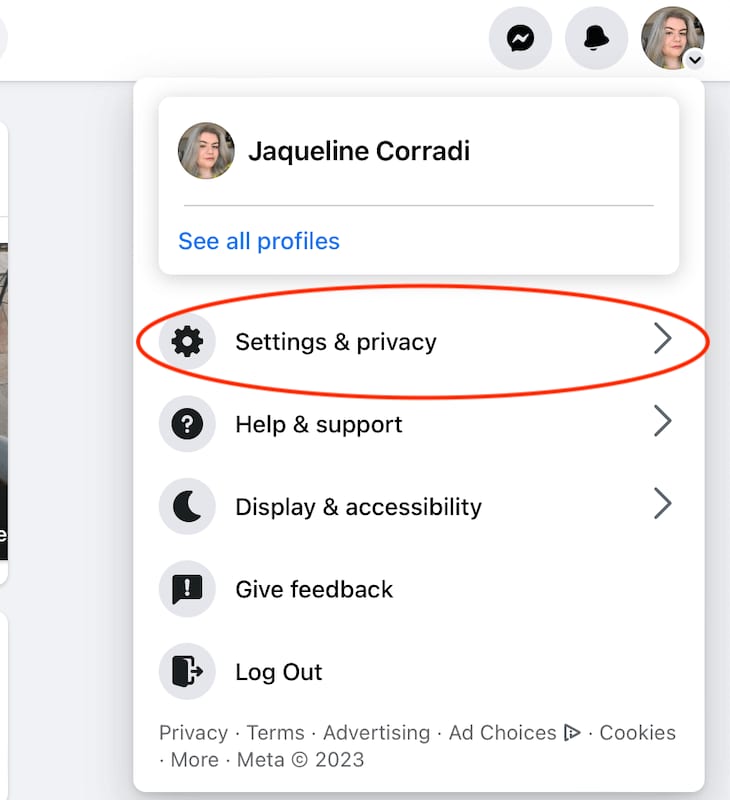
Step 2: Go to your account settings
Once you’re logged in, click on the arrow in the top right corner of the screen. This will open a drop-down menu. From the menu, select “Settings” to go to your account settings.
Step 3: Click on “Your Facebook Information”
In your account settings, click on “Your Facebook Information” in the left-hand menu. This will bring up a new page with options for managing your Facebook data.
Step 4: Select “Deactivation and Deletion”
On the “Your Facebook Information” page, you will see a section titled “Deactivation and Deletion.” Click on the “View” button next to “Deactivation and Deletion” to expand it.
Step 5: Choose “Deactivate Account”
Under the “Deactivation” section, click on the blue “Deactivate Account” link. This will bring up a pop-up window asking you to confirm your decision to deactivate.
Step 6: Select a reason for deactivating
In the pop-up window, you will be asked to select a reason for deactivating your account. Choose the one that best fits your situation or select “Other” if none of the options apply. You can also provide additional feedback in the text box below.
Step 7: Click on “Deactivate”
Once you have selected a reason, click on the “Deactivate” button. This will deactivate your account, and your profile will no longer be visible to other users.
Step 8: Enter your password and click on “Continue”
To confirm your deactivation, Facebook will ask you to enter your password. Type in your password and click on the “Continue” button.
Step 9: Confirm deactivation
In the final step, Facebook will ask you to confirm that you want to deactivate your account. Click on “Deactivate Now” to complete the process.
Congratulations! Your Facebook account has now been deactivated. You will be automatically logged out, and your profile will be hidden from other users. Remember, you can reactivate your account at any time by simply logging back in.
In conclusion, deactivating your Facebook account is a simple process that can be done in just a few steps. Whether you need a break from social media or want to protect your privacy, deactivating your account can give you peace of mind. Just remember, deactivation is not the same as deletion, and you can always come back to Facebook whenever you’re ready.In conclusion, knowing how to deactivate your Facebook account can be a useful tool for managing your online presence and protecting your privacy. By following the steps outlined in this guide, you can easily deactivate your account and take a break from the platform whenever needed. Remember to carefully consider the consequences before permanently deleting your account, and always stay informed about the latest privacy settings and updates. With these tips, you can confidently navigate your Facebook usage and maintain control over your digital footprint.
