Welcome to our comprehensive guide on how to write a check! Whether you’re new to check writing or just need a refresher, we’ve got you covered. In this article, we’ll walk you through the step-by-step process of filling out a check, from writing the date and payee to signing and recording the transaction. By the end, you’ll have all the knowledge you need to confidently write a check for any occasion. So let’s dive in and learn how to write a check like a pro!
Mastering the Art of Writing a Check: A Step-by-Step Guide
Writing a check may seem like a simple task, but it is important to do it correctly to ensure that your payment is processed accurately and on time. Whether you are writing a check for rent, bills, or a purchase, mastering the art of writing a check is an essential life skill. Follow these step-by-step instructions to learn how to write a check with confidence and precision.
Step 1: Gather Your Materials
Before you begin writing your check, make sure you have all the necessary materials. You will need a pen, a blank check, and a check register (if you have one). You may also need to have your account number and the payee’s information handy.
Step 2: Date the Check
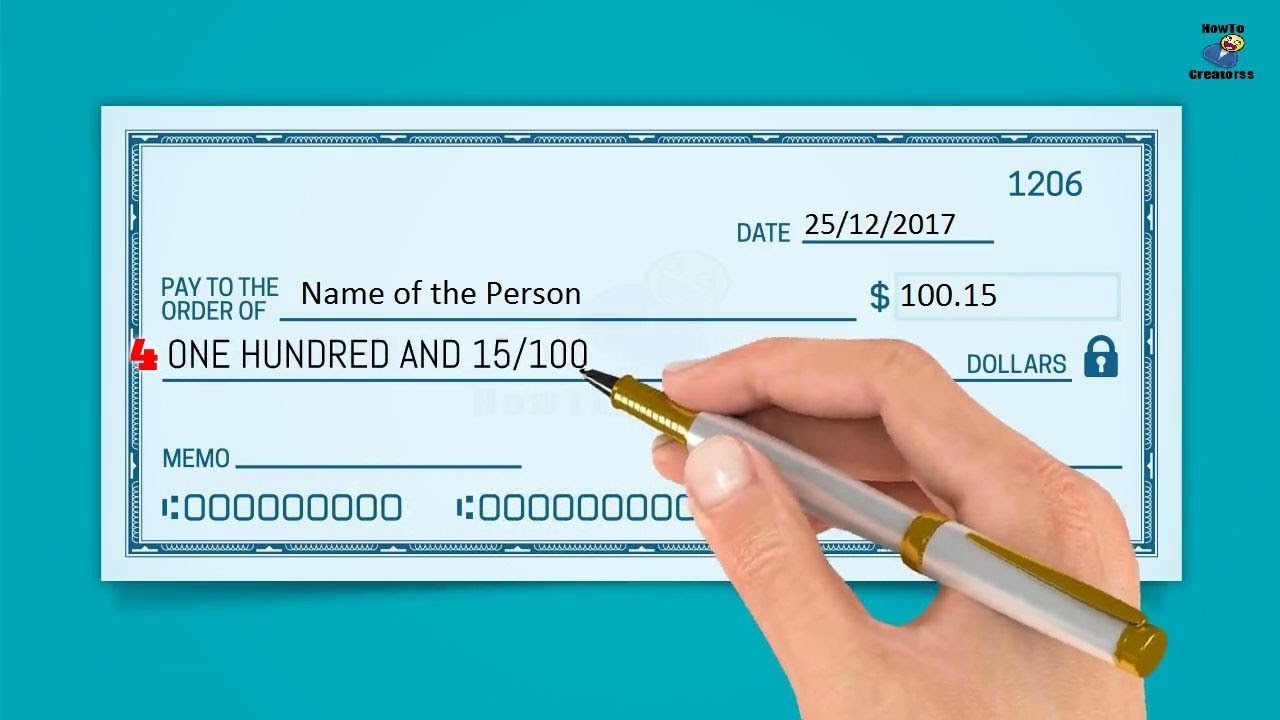
Start by filling in the date on the top right-hand corner of the check. This should be the date on which you are writing the check. It is important to use the current date to ensure that the check is valid and won’t be rejected by the bank.
Step 3: Write the Payee’s Name
Next, write the name of the person or company to whom you are making the payment on the “Pay to the Order of” line. Make sure to use the full and correct name to avoid any confusion or delays in processing.
Step 4: Fill In the Amount in Numbers
On the line next to the dollar sign ($), write the amount of the payment in numbers. Be sure to write the amount clearly and without any extra symbols or punctuation. If the amount includes cents, write a decimal point and then the number of cents (for example, $50.50).
Step 5: Write the Amount in Words
Underneath the “Pay to the Order of” line, write the amount of the payment in words. Start by writing the word “dollars” and then the amount in words. Make sure to write clearly and use proper spelling to avoid any confusion.
Step 6: Sign the Check
Sign the check on the bottom right-hand corner using the same signature that is on file with your bank. This is a crucial step as it verifies that you have authorized the payment.
Step 7: Fill Out the Memo Line (Optional)
The memo line is located in the bottom left-hand corner of the check and is used to provide a brief description of the purpose of the payment. This step is optional, but it can be helpful for record-keeping and tracking your expenses.
Step 8: Record the Payment in Your Check Register
If you have a check register, make sure to record the payment in it. This will help you keep track of your spending and maintain an accurate balance in your account.
Step 9: Tear the Check Out of the Checkbook
Once you have completed all the necessary steps, carefully tear the check out of the checkbook along the perforated edge. Make sure to keep the check stub for your records.
Step 10: Deliver the Check
The final step is to deliver the check to the payee. You can do this by mailing it, dropping it off in person, or using online bill pay if your bank offers it.
Congratulations, you have successfully written a check! By following these steps, you can ensure that your payment will be processed accurately and on time. Now you can confidently use this essential payment method for all your financial transactions.
The Ultimate Guide to Writing a Check: Tips and Tricks
Writing a check may seem like a simple task, but it’s important to do it correctly to avoid any potential issues. Whether you’re writing a check for rent, groceries, or a bill, follow these tips and tricks to ensure a smooth transaction.
Step 1: Fill out the Date
The first step in writing a check is filling out the date. This is important because it serves as a record of when the check was written. Be sure to write the full date, including the month, day, and year. You can also use shorthand, such as 4/23/2021, but make sure it is clear and legible.
Step 2: Write the Payee’s Name
Next, write the name of the person or company you are paying. Make sure to spell it correctly and use their full legal name. If you are unsure of the correct spelling, you can ask for clarification or look it up. Avoid using nicknames or abbreviations to ensure the check can be processed properly.
Step 3: Fill in the Amount in Numerical Form
In the box on the right-hand side of the check, write the amount of the payment in numerical form. Start at the far left and fill in each box with a number, including any zeros. For example, if you are paying $50.00, write “50.00” in the box. Make sure to write close to the dollar sign to avoid any extra numbers being added.
Step 4: Write the Amount in Words
Underneath the payee’s name, write out the amount in words. Start at the far left and fill in each line with the amount of the payment, using words instead of numbers. For example, if you are paying $50.00, write “Fifty Dollars and 00/100” or “Fifty and 00/100 Dollars”. Be sure to write legibly and clearly to avoid any confusion.
Step 5: Memo Line (Optional)
The memo line is where you can include a note about the purpose of the check. This can be helpful for record-keeping purposes. For example, if you are paying for a specific bill or service, you can write “Rent” or “Electric Bill” in the memo line. This step is optional, but it can be useful for both you and the recipient.
Step 6: Sign the Check
The final step is signing the check. Your signature serves as authorization for the payment. Make sure to sign the check in the bottom right-hand corner, using the same signature that is on file with your bank. If your signature has changed, be sure to update it with your bank.
Step 7: Keep a Record
After writing a check, it’s important to keep a record of the transaction. This can be done by writing the check number, date, payee, and amount in your check register or logging it in your online banking app. This will help you keep track of your spending and avoid any potential overdrafts.
In conclusion, writing a check requires attention to detail and accuracy. By following these steps, you can ensure a successful transaction and maintain good financial record-keeping. Remember to always use a pen and write neatly to avoid any issues with the check being processed. Happy check writing!
Unlock the Secrets of Writing the Perfect Check
Writing a check may seem like a simple task, but there are certain elements that can make it perfect. Whether you are writing a check for personal or business use, it is important to have a clear understanding of the process to ensure accuracy and avoid any potential errors. In this guide, we will unlock the secrets of writing the perfect check.
Step 1: Gather the Necessary Information
Before you start filling out your check, you will need to gather some important information. This includes the name of the person or business you are paying, the date, the amount you are paying, and the memo if necessary. It is important to have this information on hand to avoid any mistakes or delays.
Step 2: Write the Date
The date should be written in the top right corner of the check. This is important for record-keeping purposes and also ensures that the check can only be cashed on or after the date written.
Step 3: Write the Name of the Payee
The next step is to write the name of the person or business you are paying on the “Pay to the Order of” line. Be sure to use the full legal name to avoid any confusion or potential issues with cashing the check.
Step 4: Write the Amount in Numerical Form
On the line next to the dollar sign, write the amount you are paying in numerical form. Be sure to use decimal points and commas where necessary. For example, if you are paying $500.50, you would write “500.50” on this line.
Step 5: Write the Amount in Written Form
In the box below the payee line, write the amount in written form. Be sure to write the amount in words and include “dollars” and “cents”. For example, if you are paying $500.50, you would write “Five hundred and fifty cents” on this line.
Step 6: Sign the Check
In the bottom right corner of the check, there is a line for your signature. Be sure to sign your name exactly as it appears on the front of the check. This is your authorization for the check to be processed.
Step 7: Optional Memo Line
If you would like to include a note or memo on the check, you can do so on the memo line located in the bottom left corner. This is not a required step but can be helpful for record-keeping purposes.
Step 8: Record the Transaction
It is important to keep a record of all checks written for your own personal records and for tax purposes. You can do this by recording the information in your check register or by using a budgeting software.
Step 9: Confirm Accuracy
Before submitting the check, be sure to double-check all of the information to ensure accuracy. This includes the date, payee, and amount in both numerical and written form.
Step 10: Mail or Hand Deliver the Check
Once you have confirmed that all information is accurate, you can either mail the check or hand deliver it to the recipient. If mailing, be sure to use a secure envelope and include proper postage.
In conclusion, writing the perfect check is a simple process but requires attention to detail and accuracy. By following these steps and understanding the necessary elements of a check, you can ensure that your checks are written correctly and processed without any issues.In conclusion, learning how to write a check can be a simple and useful skill to have. By following these easy steps and tips, you can confidently and accurately write checks for various transactions. Remember to double check all information before signing and to keep a record of your checks for future reference. With practice and attention to detail, writing a check will become second nature. So, don’t hesitate to start practicing and mastering this essential financial skill today!
