image source: https://www.keyanalyzer.com
Welcome to our comprehensive guide on how to take a screenshot in Windows. In today’s digital world, capturing and sharing images has become an essential part of communication. Whether you want to save an important document, capture a funny meme, or share a screenshot to troubleshoot a technical issue, knowing how to take a screenshot in Windows can come in handy in various situations. In this guide, we will walk you through the different methods to take a screenshot on your Windows computer, along with useful tips and tricks to make the process easier. So let’s dive in and master the art of taking screenshots in Windows!
Master the Art of Taking Screenshots in Windows: A Comprehensive Guide
Introduction
Screenshots are a useful tool for capturing and sharing information on your computer screen. Whether you need to show someone an error message, demonstrate a process, or simply save a picture of something you find interesting, knowing how to take screenshots in Windows can come in handy. In this guide, we will explore the different methods and techniques for taking screenshots in Windows, as well as some tips and tricks to help you master the art of screenshotting.
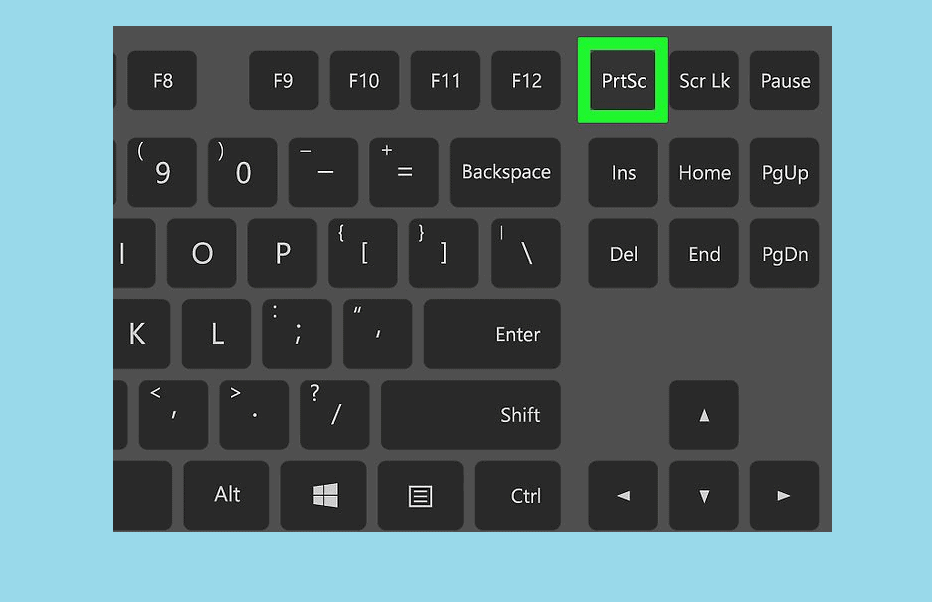
Method 1: Using the Print Screen Key
The most common and basic method for taking a screenshot in Windows is by using the Print Screen key on your keyboard. This key is usually labeled as “PrtScn” or “Print Scr” and is typically located in the top right corner of your keyboard.
To take a screenshot using this method, simply press the Print Screen key. This will capture an image of your entire screen and save it to your clipboard. You can then paste the screenshot into a document or image editing program by pressing “Ctrl + V” or right-clicking and selecting “Paste.”
If you only want to capture the active window, you can use the “Alt + Print Screen” combination. This will take a screenshot of the window that is currently in focus.
Method 2: Using the Snipping Tool
Windows also has a built-in tool called the Snipping Tool that allows you to capture specific areas of your screen. To open the Snipping Tool, go to the Start menu and type “snipping tool” into the search bar. Click on the app to open it.
Once the Snipping Tool is open, click on “New” to start a new snip. You can then use your mouse to select the area of your screen you want to capture. You can also choose from different types of snips such as free-form, rectangular, or full-screen.
After you have captured your snip, you can save it by clicking on the “Save” button or copy and paste it into another program as described in method 1.
Method 3: Using the Game Bar (for Windows 10)
If you are using Windows 10, you can also use the Game Bar to take screenshots. This method is particularly useful for capturing screenshots while playing games, but it can be used for any program or window.
To open the Game Bar, press the Windows key + G on your keyboard. Click on the camera icon or press “Win + Alt + PrtScn” to take a screenshot. You can also use the Game Bar to record video footage of your screen.
Tips and Tricks
– To take a screenshot of a specific window without using the Print Screen key, click on the window to make it active and then press “Alt + Print Screen.”
– If you want to capture a specific portion of your screen but don’t want to use the Snipping Tool, you can use the “Windows + Shift + S” shortcut. This will bring up a snipping tool overlay that allows you to select the area you want to capture.
– Screenshots are saved to your clipboard by default, but you can also save them as image files by using the Snipping Tool or Game Bar. This allows you to easily share and store your screenshots.
– If you want to take screenshots regularly, consider customizing the Snipping Tool or Game Bar keyboard shortcuts to make the process faster and more convenient for you.
Conclusion
Taking screenshots in Windows is a simple yet powerful tool that can helpIn conclusion, knowing how to take a screenshot in Windows is a valuable skill that can save time and increase productivity. By following the simple steps outlined above, users can easily capture and save images of their screen, making it easier to share information and troubleshoot issues. With the growing importance of visual content, being able to take a screenshot in Windows is a crucial skill for both personal and professional use. So, don’t wait any longer and start capturing your screen today!
