Are you looking for a quick and easy way to capture screenshots on your laptop? Look no further! In this tutorial, we will guide you through the step-by-step process of how to take a screenshot on your laptop. Whether you are using a Windows, Mac, or Chromebook, we have got you covered. Say goodbye to complicated keyboard shortcuts and let us show you the simple methods to take screenshots on your laptop. Let’s get started!
Step-by-Step Guide: How to Take a Screenshot on Your Laptop
Taking a screenshot on your laptop is a useful skill that can come in handy for a variety of reasons. Whether you want to capture a funny meme, save an important piece of information, or show someone an error message, knowing how to take a screenshot can save you time and effort. In this step-by-step guide, we will walk you through the process of taking a screenshot on your laptop.
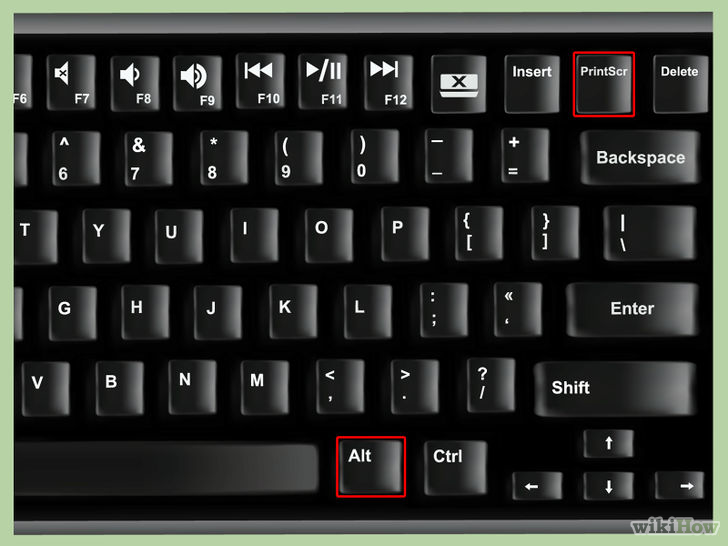
Step 1: Find the Print Screen (PrtScn) button on your keyboard
The first step to taking a screenshot on your laptop is to locate the Print Screen button on your keyboard. This button is typically located in the top right corner of the keyboard, and it may be labeled as “PrtScn,” “PrtSc,” or “Print Scr.” If you are using a laptop with a smaller keyboard, you may need to press the “Fn” key along with the Print Screen button.
Step 2: Decide what you want to capture
Before taking a screenshot, it is important to decide what you want to capture. Do you want to capture the entire screen, a specific window, or a portion of the screen? This will help you determine which method to use for taking the screenshot.
Step 3: Take a full-screen screenshot
To capture the entire screen, simply press the Print Screen button. This will save an image of your entire screen to your clipboard. You can then paste the screenshot into an image editing program, such as Paint or Photoshop, and save it as an image file.
Step 4: Take a screenshot of a specific window
If you only want to capture a specific window, press the Alt + Print Screen buttons simultaneously. This will capture the active window and save it to your clipboard. You can then paste and save the screenshot as an image file.
Step 5: Take a screenshot of a selected area
If you want to capture a specific area of your screen, press the Windows + Shift + S keys simultaneously. This will bring up a tool called “Snip & Sketch,” which allows you to select a specific area of your screen to capture. Once you have selected the area, the screenshot will be saved to your clipboard. You can then paste and save it as an image file.
Step 6: Use the Snipping Tool
If you are using a Windows 7 or earlier version, you can use the Snipping Tool to take screenshots. Simply open the Snipping Tool from the Start menu, click on “New,” and then select the area of your screen you want to capture. The screenshot will be saved to your clipboard, and you can then paste and save it as an image file.
Step 7: Use a third-party screenshot tool
There are many third-party screenshot tools available that offer more advanced features, such as editing tools and the ability to save screenshots to specific folders. Some popular options include Greenshot, Lightshot, and Snagit. These tools can be downloaded and installed on your laptop for easier and more efficient screenshot taking.
Step 8: Paste and save your screenshot
Once you have taken the screenshot, you can paste it into an image editing program or document and save it as an image file. You can also directly paste the screenshot into an email or messaging app to share it with others.
Congratulations, you have successfully taken a screenshot on your laptop! Remember to practice and experiment with different methods to find the one that works best for you. Happy screenshotting!
Mastering the Art of Screenshotting on Your Laptop: A Beginner’s Tutorial
Screenshots are a useful tool for capturing and sharing information on your laptop. Whether you need to save an error message, capture an important image, or show a step-by-step process, mastering the art of screenshotting can greatly benefit your productivity and communication. In this beginner’s tutorial, we will guide you through the steps of taking and saving screenshots on your laptop.
Step 1: Understanding the Different Types of Screenshots
Before we dive into the technical aspects of taking a screenshot, it is important to understand the different types of screenshots available on your laptop. The two most common types are the full-screen screenshot and the partial screenshot. A full-screen screenshot captures the entire contents of your laptop screen, while a partial screenshot allows you to select a specific area to capture.
Step 2: Using the Built-in Screenshot Tool
Most laptops come equipped with a built-in screenshot tool, making the process of taking screenshots quick and easy. On Windows laptops, the Snipping Tool or the Snip & Sketch app can be accessed by typing their names in the search bar. On Mac laptops, the shortcut Command + Shift + 3 will take a full-screen screenshot, while Command + Shift + 4 will allow you to select a specific area to capture.
Step 3: Using Keyboard Shortcuts
For a faster and more efficient way of taking screenshots, you can use keyboard shortcuts. On Windows laptops, the shortcut Alt + PrtScn will take a full-screen screenshot, while Windows + PrtScn will save it directly to your Pictures folder. On Mac laptops, the shortcut Command + Shift + 5 will bring up the screenshot toolbar, allowing you to select the type of screenshot you want to take.
Step 4: Saving and Editing Your Screenshots
Once you have taken your screenshot, it is important to save it in a location that is easy to access. On Windows laptops, you can use the shortcut Ctrl + V to paste the screenshot into an image editing program, where you can make any necessary edits before saving it. On Mac laptops, the screenshot will automatically appear as a thumbnail in the bottom right corner of your screen, where you can click on it to open and edit it.
Step 5: Sharing Your Screenshots
Now that you have successfully taken and saved your screenshot, you can easily share it with others. Simply attach the saved image to an email, upload it to a shared document, or use a messaging app to send it to your desired recipient.
In conclusion, screenshots are a valuable tool for capturing and sharing information on your laptop. By using the built-in screenshot tool, keyboard shortcuts, and understanding how to save and edit your screenshots, you can master the art of screenshotting and improve your productivity and communication. With practice, you will become a pro at taking screenshots and be able to efficiently communicate your ideas and share important information with others.
Effortless Ways to Capture Screenshots on Your Laptop: A Comprehensive Guide
Capturing screenshots on your laptop is a useful and convenient way to save and share information. It allows you to easily capture images of your screen, whether it’s to show a friend something funny, save an important image, or demonstrate a technical issue to a customer service representative. Fortunately, there are several effortless ways to capture screenshots on your laptop, regardless of what operating system you are using. In this comprehensive guide, we will walk you through the steps to take screenshots on Windows, MacOS, and ChromeOS.
Windows:
1. The Print Screen (PrtScn) Button: The simplest way to take a screenshot on a Windows laptop is by using the Print Screen button on your keyboard. This button is usually labeled as “PrtScn” and can be found in the top right corner of your keyboard. When you press this button, it will capture a screenshot of your entire screen and save it to your clipboard.
2. Windows + Print Screen: An even quicker way to take a screenshot on a Windows laptop is by using the Windows + Print Screen shortcut. This will automatically save the screenshot to your designated “Screenshots” folder in your Pictures library.
3. Snipping Tool: For more advanced screenshot options, you can use the Snipping Tool. This tool allows you to capture a specific area of your screen, a window, or the entire screen. To access this tool, simply type “Snipping Tool” in your search bar and click on the application.
MacOS:
1. Command + Shift + 3: To take a screenshot on a MacOS laptop, press the Command + Shift + 3 keys simultaneously. This will capture a screenshot of your entire screen and save it to your desktop.
2. Command + Shift + 4: If you only want to capture a specific area of your screen, use the Command + Shift + 4 shortcut. This will turn your cursor into a crosshair, allowing you to select the area you want to capture. Once you release the keys, the screenshot will be saved to your desktop.
3. Command + Shift + 5: For more advanced screenshot options, use the Command + Shift + 5 shortcut. This will open the screenshot toolbar, where you can choose to capture a specific area, a window, or record your screen.
ChromeOS:
1. Print Screen: On a Chromebook, the Print Screen button also functions as the screenshot button. Simply press this button to capture a screenshot of your entire screen.
2. Ctrl + Switch Window: To capture a specific area of your screen on a Chromebook, use the Ctrl + Switch Window keys. The Switch Window key is located in the top row of your keyboard, marked with a rectangle and two lines. Once pressed, your cursor will turn into a crosshair, allowing you to select the area you want to capture.
3. Chrome Extension: If you prefer a more customizable screenshot tool, you can download a Chrome extension like “Awesome Screenshot.” This extension allows you to capture a specific area, the entire screen, or even record your screen.
In conclusion, taking screenshots on your laptop is a simple and effortless task. Whether you are using Windows, MacOS, or ChromeOS, there are various methods to capture screenshots according to your preferences. With these easy steps, you can quickly and efficiently capture and share information with others.In conclusion, knowing how to take a screenshot in a laptop can greatly enhance your productivity and make sharing information easier. By following the steps outlined above, you can easily capture and save important images on your laptop. Don’t forget to experiment with different methods and find the one that works best for you. With this knowledge, you can confidently navigate your laptop and capture any screen you need. Keep these tips in mind to take screenshots quickly and efficiently. Thank you for reading and happy screenshotting!
