Are you wondering how to take a screenshot on your laptop? Look no further, as we have all the tips and tricks you need to know in order to capture your screen with ease. Whether you have a Windows or Mac laptop, we have got you covered. Keep reading to find out the step-by-step guide on how to screenshot on laptop.
Step-by-Step Guide: How to Screenshot on a Laptop Easily and Quickly
Screenshots are a useful way to capture and save images of your computer screen. They can be used for a variety of purposes, such as saving important information, sharing visual content, or troubleshooting technical issues. If you’re not familiar with how to take a screenshot on your laptop, don’t worry – we’ve got you covered. In this step-by-step guide, we’ll walk you through the process of taking a screenshot on a laptop, so you can easily and quickly capture what’s on your screen.
Step 1: Determine the Type of Screenshot You Want to Take
The first step to taking a screenshot on your laptop is to determine the type of screenshot you want to take. There are two main types of screenshots: full-screen and partial. A full-screen screenshot captures everything that is currently displayed on your screen, while a partial screenshot allows you to select and capture a specific area of your screen.
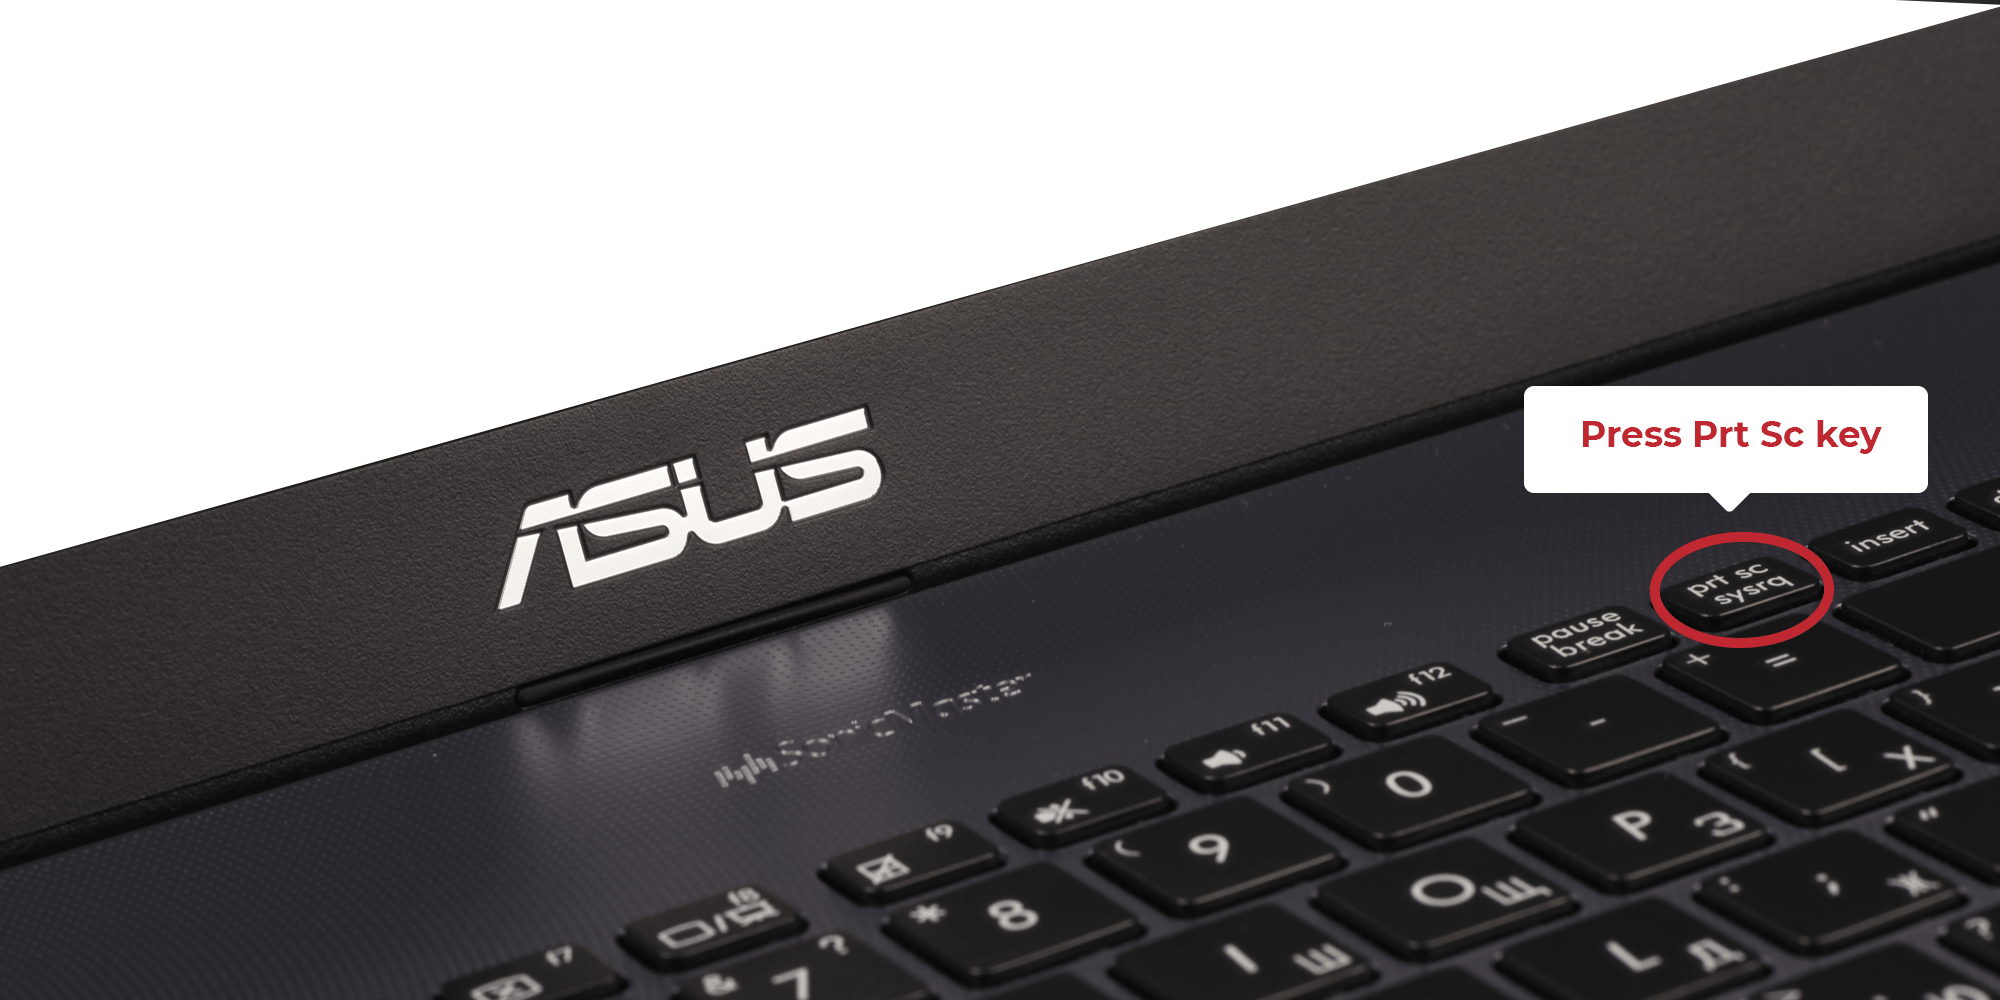
Step 2: Locate the “Print Screen” Button
The “Print Screen” button, also known as “PrtScn” or “PrtSc”, is the key you will be using to take a screenshot on your laptop. On most laptops, this button is located in the top-right corner of the keyboard. However, on some laptops, you may need to use the “Fn” or “Function” key in combination with the “Print Screen” key to take a screenshot.
Step 3: Take a Full-Screen Screenshot
To take a full-screen screenshot, simply press the “Print Screen” button. This will capture an image of your entire screen and save it to your computer’s clipboard. You can then paste the screenshot into a document, email, or image editing software by pressing “Ctrl” and “V” at the same time.
Step 4: Take a Partial Screenshot
If you want to capture a specific area of your screen, press the “Alt” and “Print Screen” keys at the same time. This will allow you to select the area you want to capture. Simply click and drag your mouse to select the desired area, and release the mouse button to take the screenshot.
Step 5: Save Your Screenshot
Once you have taken your screenshot, you can save it to your computer as an image file. To do this, open an image editing software, such as Paint or Photoshop, and press “Ctrl” and “V” to paste the screenshot. You can then edit, crop, and save the image in the desired format.
Step 6: Use the Snipping Tool (Windows Only)
If you’re using a Windows laptop, you can also use the built-in Snipping Tool to take and save screenshots. Simply search for “Snipping Tool” in your computer’s search bar, open the program, and click on “New” to capture a screenshot. You can then save the screenshot to your computer.
Step 7: Utilize Third-Party Screenshot Tools
There are also various third-party screenshot tools available for both Windows and Mac laptops. These tools offer additional features, such as the ability to annotate or edit your screenshots, and can be downloaded for free or for a fee.
Congratulations, you now know how to take a screenshot on your laptop! By following these simple steps, you can easily and quickly capture and save images of your computer screen for various purposes. Whether you’re a student, professional, or simply someone who likes to document their online activities, knowing how to take
Master the Art of Taking Screenshots on Your Laptop with These Simple Steps
Taking screenshots on your laptop can be a useful skill to have, whether you need to capture an error message for technical support or save a funny meme to share with your friends. However, the process of taking screenshots may differ depending on the type of laptop you have. In this guide, we will walk you through the steps to master the art of taking screenshots on your laptop.
Step 1: Understand the Different Types of Screenshots
Before we dive into the steps, it is important to understand the different types of screenshots you can take on your laptop. The two most common types are full-screen screenshots and partial screenshots.
A full-screen screenshot captures everything that is currently displayed on your laptop screen, while a partial screenshot allows you to select a specific area to capture.
Step 2: Know Your Keyboard Shortcuts
Most laptops have built-in keyboard shortcuts that allow you to take screenshots quickly and easily. These shortcuts may vary depending on the operating system you are using, so it is important to know the specific shortcuts for your laptop.
For Windows laptops, the most common shortcuts are:
– Full-screen screenshot: Press the “Windows” key + “PrtScn” button.
– Partial screenshot: Press the “Windows” key + “Shift” + “S” buttons. This will bring up a selection tool for you to choose the specific area you want to capture.
For Mac laptops, the most common shortcuts are:
– Full-screen screenshot: Press the “Command” + “Shift” + “3” buttons.
– Partial screenshot: Press the “Command” + “Shift” + “4” buttons. This will bring up a selection tool for you to choose the specific area you want to capture.
Step 3: Use the Snipping Tool (Windows)
If your laptop does not have built-in keyboard shortcuts or you prefer a more precise method of capturing partial screenshots, you can use the Snipping Tool on Windows. This tool allows you to select a specific area of your screen to capture and save as an image.
To use the Snipping Tool, follow these steps:
1. Type “Snipping Tool” in the search bar on your laptop and open the application.
2. Click on “New” in the top left corner of the Snipping Tool window.
3. Use your cursor to select the area you want to capture.
4. Once selected, the screenshot will appear in the Snipping Tool window.
5. Click on “File” and then “Save As” to save the screenshot to your desired location.
Step 4: Use the Grab Tool (Mac)
Mac laptops also have a built-in tool for capturing partial screenshots called the Grab Tool. This tool allows you to select a specific area of your screen to capture and save as an image.
To use the Grab Tool, follow these steps:
1. Open the “Finder” on your Mac and go to “Applications.”
2. Scroll down to “Utilities” and open the “Grab” application.
3. Click on “Capture” in the top menu bar.
4. Select either “Selection,” “Window,” or “Screen” depending on the type of screenshot you want to take.
5. Once selected, the screenshot will appear in a new window.
6. Click on “File” and then “Save” to save the screenshot to your desired location.
Step 5: Utilize Third-Party Applications
If you are looking for more advanced features and options for taking screenshots, you can
Discover the Easiest Way to Screenshot on a Laptop in Just a Few Clicks
Capturing a screenshot on a laptop is a simple yet essential task that can come in handy for a variety of reasons. Whether you’re trying to save a funny meme, document an important piece of information, or troubleshoot a technical issue, knowing how to take a screenshot on your laptop is a useful skill to have.
Fortunately, the process of taking a screenshot on a laptop has become easier than ever before. In just a few clicks, you can capture and save an image of whatever is displayed on your laptop screen. In this article, we’ll guide you through the easiest way to screenshot on a laptop, so you can quickly and effortlessly capture images whenever you need to.
Step 1: Identify the Screenshot Key
The first step to taking a screenshot on a laptop is to identify the correct key on your keyboard. Depending on the type of laptop you have, this key may vary. However, the most common keys used for taking screenshots are “Print Screen” or “PrtScn” for Windows laptops, and “Command + Shift + 3” for Mac laptops.
Step 2: Press the Screenshot Key
Once you’ve identified the screenshot key, simply press it to capture an image of your laptop screen. If you’re using a Windows laptop, the screenshot will be saved to your clipboard. If you’re using a Mac laptop, the screenshot will be saved as a file on your desktop.
Step 3: Paste or Save the Screenshot
After pressing the screenshot key, you can either paste the image directly into a document or save it as a file. To paste the image, open a document or image editing program, right-click and select “paste” or use the shortcut keys “Ctrl + V” for Windows laptops and “Command + V” for Mac laptops.
If you want to save the screenshot as a file, simply go to the location where you want to save it, right-click, and select “paste” or use the shortcut keys mentioned above. The screenshot will be saved as a PNG file with the current date and time as the file name.
Step 4: Edit and Annotate (Optional)
If you want to make any edits or annotations to your screenshot, you can use a variety of free online tools or image editing software. These tools allow you to crop, resize, add text, and draw on your screenshot to highlight important information or blur out sensitive information.
Bonus Tips for Taking Screenshots on a Laptop
– To take a screenshot of a specific window, press the “Alt + PrtScn” keys for Windows laptops and “Command + Shift + 4” for Mac laptops. This will capture only the active window and save it to your clipboard or desktop.
– If you want to take a screenshot of a specific portion of your screen, use the “Snipping Tool” on Windows laptops or the “Command + Shift + 4” keys on Mac laptops. This tool allows you to select and capture a specific area on your screen.
– Some laptops also have a dedicated “Screenshot” key or a “Fn + PrtScn” combination that can be used to take a screenshot.
Taking a screenshot on a laptop may seem like a daunting task, but with the right knowledge and tools, it can be done with ease. By following the steps outlined above, you can quickly and effortlessly capture and save images of your laptop screen whenever needed. So, the next time you need to take a screenshotIn conclusion, knowing how to screenshot on a laptop is an invaluable skill that can greatly enhance your productivity and make sharing information easier. By using the simple steps outlined in this guide, you can easily capture and save screenshots on your laptop. Remember to also consider the different methods available and choose the one that best suits your needs. With this knowledge, you can confidently navigate your laptop and take screenshots in a quick and efficient manner. So, next time you need to save an image or document, you’ll know exactly how to screenshot on your laptop.
