Welcome to our guide on how to screen record on Mac! In today’s digital world, screen recording has become an essential tool for many purposes, such as creating tutorials, capturing gameplay, or recording online meetings. With a Mac, you have a built-in screen recording feature that allows you to easily capture your screen activity. In this tutorial, we will walk you through the step-by-step process of how to screen record on Mac, so you can start creating high-quality recordings in no time. So let’s get started and learn how to utilize this powerful feature on your Mac!
Step-by-Step Guide: How to Screen Record on Mac
Screen recording is a useful tool for demonstrating tasks, creating tutorials, or capturing video calls on your Mac. It allows you to record what’s happening on your screen and save it as a video file that you can easily share with others. In this guide, we will take you through the steps of how to screen record on your Mac.
Step 1: Open QuickTime Player
The first step is to open QuickTime Player, which is the default media player on Mac. You can find it in the Applications folder or by searching for it in Spotlight.
Step 2: Select “New Screen Recording”
In the menu bar, click on “File” and then select “New Screen Recording” or use the shortcut key “Command + Control + N”.
Step 3: Set up your recording options
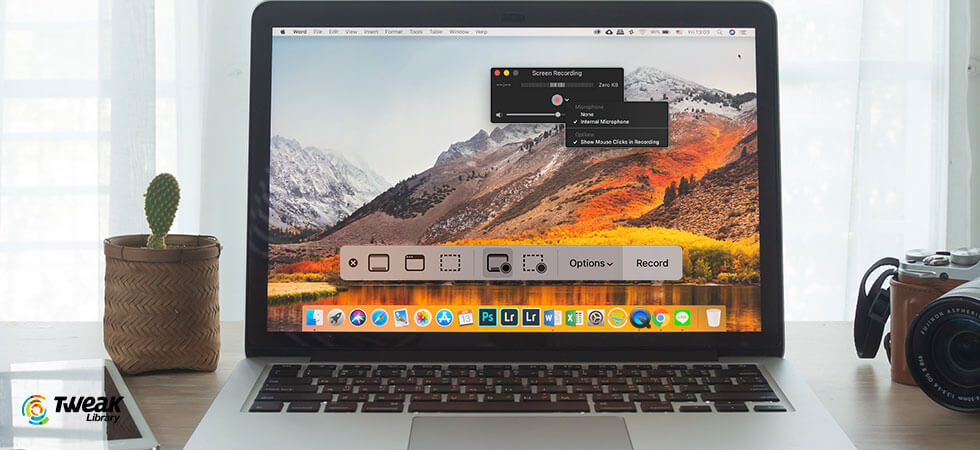
A small recording window will appear on your screen. Before you start recording, you can customize your recording options by clicking on the small arrow next to the record button. Here, you can choose to record your entire screen or a specific portion of it. You can also select whether to capture audio from your computer’s microphone or not.
Step 4: Start recording
Once you have selected your desired options, click on the record button to start the screen recording. You can also choose to record your screen with or without audio by clicking on the corresponding buttons in the recording window.
Step 5: Stop and save the recording
When you are finished with your recording, click on the stop button in the menu bar or use the shortcut key “Command + Control + Esc” to stop the recording. A preview of the recording will appear, and you can choose to save it or discard it. If you choose to save it, select a location on your Mac to save the video file.
Step 6: Edit and Share
If you want to make any edits to your recording, you can open it in QuickTime Player or use a video editing software. Once you are satisfied with the final video, you can easily share it with others by uploading it to a cloud storage service or sending it through email.
Tips for a successful screen recording:
– Make sure to have enough storage space on your Mac to save the video file.
– Close any unnecessary applications or windows before recording to avoid distractions.
– Use a microphone for better audio quality if you are recording a tutorial or video call.
– Practice beforehand to ensure a smooth recording process.
In conclusion, screen recording on Mac is a simple and useful feature that can enhance your productivity and communication. With this step-by-step guide, you can easily capture and share your screen recordings with others. Happy recording!
Easily Record Your Screen on Mac: A Comprehensive Tutorial
Recording your screen on a Mac can be a useful tool for a variety of purposes, whether you are creating a tutorial, demonstrating a software, or capturing a memorable moment. Fortunately, recording your screen on a Mac is a straightforward process that can be done with built-in features or third-party applications. In this tutorial, we will cover the steps for recording your screen on a Mac using both methods.
Method 1: Using Built-In Features
Step 1: Open QuickTime Player
QuickTime Player is a built-in application on Mac that can be used for video and audio playback, as well as screen recording. To open QuickTime Player, click on the Finder icon in your dock, then navigate to Applications > QuickTime Player.
Step 2: Access Screen Recording
Once QuickTime Player is open, click on the File menu and select New Screen Recording. You can also use the shortcut key Command + Control + N to access this feature.
Step 3: Adjust Recording Settings
A small screen recording window will appear on your screen. You can click on the arrow next to the record button to adjust your recording settings, such as choosing a microphone or selecting a portion of your screen to record.
Step 4: Start Recording
Once you have adjusted your settings, click on the record button to start recording. You can also use the shortcut key Command + Control + R to begin recording.
Step 5: Stop Recording and Save
To stop the recording, click on the stop button in the menu bar or use the shortcut key Command + Control + E. Your recording will then be saved automatically in QuickTime Player.
Method 2: Using Third-Party Applications
If you prefer more features and customization options, you can opt for third-party screen recording applications. One popular option is ScreenFlow, which offers advanced editing tools for your recordings.
Step 1: Download and Install ScreenFlow
You can download ScreenFlow from its official website and follow the installation instructions to set it up on your Mac.
Step 2: Launch ScreenFlow
Once the application is installed, launch it from your Applications folder or by searching for it in Spotlight.
Step 3: Adjust Recording Settings
ScreenFlow offers various recording settings, such as choosing a specific area of your screen to record, adding audio inputs, and selecting a frame rate. You can access these settings by clicking on the Recording Options button in the toolbar.
Step 4: Start Recording
After you have adjusted your settings, click on the record button in the toolbar or use the shortcut key Command + Option + R to begin recording.
Step 5: Stop Recording and Save
To stop the recording, click on the stop button in the toolbar or use the shortcut key Command + Option + E. Your recording will then be saved automatically in ScreenFlow.
Tips for Better Screen Recording on Mac
– Make sure you have enough storage space on your Mac before recording.
– Close any unnecessary applications or notifications to avoid interruptions.
– Use a quality microphone for better audio in your recordings.
– Familiarize yourself with the recording settings to customize your recordings according to your needs.
– Practice and do test recordings before recording important content.
In conclusion, recording your screen on a Mac is a simple and convenient process that can be done with built-in features or third-party applications. By following the steps outlined in this tutorial and keeping in mind some tips for better recording, you can easily create high-quality screen recordings for various purposes.
Mastering Screen Recording on Mac: A Beginner’s Guide
Screen recording on Mac is a useful tool for creating tutorials, demos, and presentations. It allows you to capture your screen and audio, making it easy to share your knowledge and skills with others. Whether you are a beginner or have some experience with screen recording, this guide will help you master the process on your Mac.
Step 1: Check your Mac’s compatibility
Before diving into screen recording, it is important to make sure that your Mac is compatible with the latest version of macOS. Screen recording is available on Macs running macOS Mojave or later. You can check your macOS version by going to the Apple menu and selecting “About This Mac.”
Step 2: Familiarize yourself with the screen recording tools
The screen recording feature on Mac can be accessed through the QuickTime Player app. To open QuickTime Player, go to your Applications folder and double-click on the app icon. Once opened, click on “File” in the top menu bar and select “New Screen Recording.” You can also use the keyboard shortcut “Command + Control + N.”
Step 3: Customize your screen recording settings
Before starting your screen recording, you can customize certain settings to fit your needs. These options can be found by clicking on the small arrow next to the red record button. You can choose to record your entire screen or a specific portion by clicking on the “Options” menu. You can also choose to record audio from your computer’s microphone or a connected external microphone.
Step 4: Start your screen recording
Once you have customized your settings, click on the red record button to start your screen recording. A three-second countdown will appear before the recording begins. You can pause or stop the recording by clicking on the stop button in the menu bar or using the keyboard shortcut “Command + Control + Esc.”
Step 5: Edit and save your recording
After stopping your recording, you can preview it and make any necessary edits. To do this, click on “File” in the menu bar and select “Save” to save your recording. You can also choose to trim the beginning or end of your recording by clicking on “Edit” and selecting “Trim.” This will bring up a bar that you can drag to the desired starting or ending point of your recording.
Step 6: Share your recording
Once you have saved your recording, you can easily share it with others. You can upload it to a video hosting platform or social media, or you can simply send it as a file through email or messaging. QuickTime Player also has the option to directly share your recording to platforms like YouTube or Vimeo.
Tips for a successful screen recording:
– Make sure your Mac is fully charged or plugged in to avoid any interruptions during your recording.
– Close any unnecessary windows or applications to avoid distractions.
– Use a microphone for better audio quality.
– Practice your recording beforehand to ensure a smooth and professional final product.
In conclusion, screen recording on Mac is a powerful tool for creating informative and engaging content. With these steps, you can easily master the process and share your knowledge with others. So go ahead and start recording your screen like a pro!In conclusion, knowing how to screen record on a Mac is a valuable skill that can greatly enhance your digital workflow and productivity. By following the simple steps outlined in this guide, you can easily capture and save important moments from your screen with ease. Incorporating screen recording into your routine can also improve your SEO efforts by creating engaging and informative video content for your website or social media platforms. So don’t wait any longer, start screen recording on your Mac today and take your online presence to the next level!
