“Looking for an easy way to capture and share your iPhone screen? Look no further! In this guide, we will show you how to screen record on iPhone in just a few simple steps. Whether you want to record a tutorial, save a funny video, or document a bug for tech support, we’ve got you covered. Keep reading to learn the best methods for screen recording on your iPhone and make your content creation process a breeze!”
Ultimate Guide: How to Screen Record on iPhone in Just a Few Simple Steps
Screen recording has become an essential tool for many iPhone users, whether for work or personal purposes. It allows you to capture your screen in real-time, making it incredibly useful for creating tutorials, demos, or sharing gameplay footage. With the latest iOS updates, screen recording has become easier than ever before. In this ultimate guide, we will walk you through the steps of how to screen record on your iPhone in just a few simple steps.
Step 1: Enable Screen Recording in Control Center
Before you can start recording your screen, you need to enable the screen recording feature in your Control Center. To do this, open your iPhone’s Settings and go to “Control Center.” From there, tap on “Customize Controls” and scroll down until you see the “Screen Recording” option. Tap on the green plus sign next to it to add it to your Control Center.
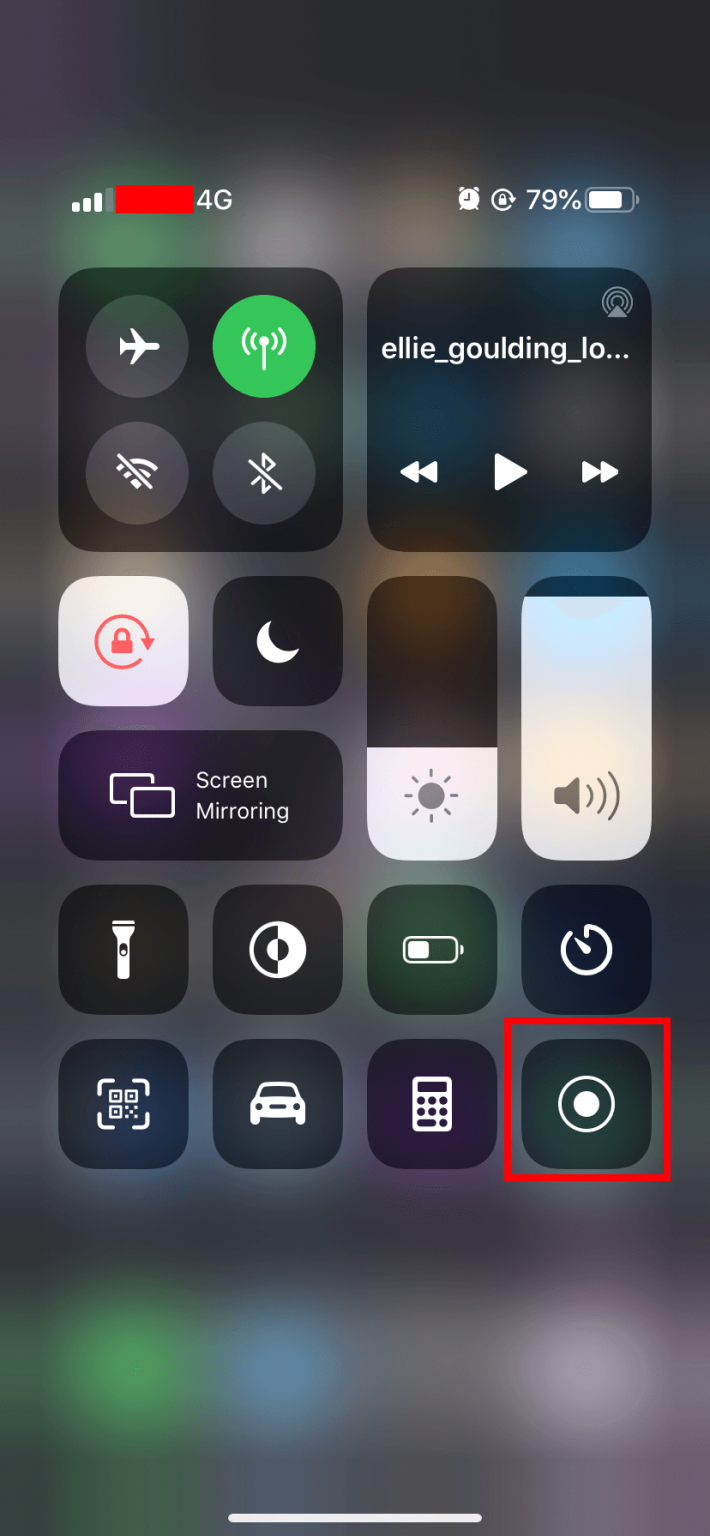
Step 2: Access Control Center
Once you have enabled screen recording, you can access it by swiping down from the top right corner of your iPhone’s screen. On older iPhones with a physical home button, swipe up from the bottom of the screen to access Control Center.
Step 3: Start Recording
In the Control Center, you will see a circle with a white dot in the middle. This is the screen recording button. Tap on it to start recording. A three-second countdown will appear, giving you time to switch to the screen you want to record.
Step 4: Stop Recording
To stop the recording, you can either tap on the red bar at the top of your screen or go back to the Control Center and tap on the screen recording button again. A pop-up will appear, asking if you want to stop the recording. Tap on “Stop” to confirm.
Step 5: Save and Edit Your Recording
Once you have stopped the recording, it will automatically be saved to your camera roll. You can access it by going to the Photos app. From there, you can edit your recording by tapping on the “Edit” button. This will allow you to trim the video, add text or drawings, and even add background music.
Step 6: Share Your Recording
After editing, you can share your recording with others. You can either send it directly through messaging apps or social media or save it to your iCloud or Dropbox to access it from other devices.
Additional Tips:
– To record audio along with your screen recording, long-press on the screen recording button in the Control Center and toggle on the “Microphone Audio” option.
– You can also use screen recording during a FaceTime call by tapping on the screen recording button in the Control Center while on the call.
– If you want to record your screen without the red bar at the top, go to “Settings” > “Control Center” > “Customize Controls” and tap on the red minus sign next to “Screen Recording.”
In conclusion, screen recording on your iPhone is a simple and useful feature that can make your life easier. With just a few taps, you can capture and share your screen with others. So go ahead and give it a try the next time you need to show someone how to do something on your iPhone or capture a memorable moment.
Mastering Screen Recording on iPhone: Step-by-Step Tutorial
Screen recording on iPhone is a useful feature that allows you to capture your phone’s screen activity and create a video. It is particularly helpful for creating tutorials, sharing gameplay, or troubleshooting technical issues. In this step-by-step tutorial, we will guide you through the process of mastering screen recording on your iPhone.
Step 1: Enable Screen Recording
The first step is to make sure that the screen recording feature is enabled on your iPhone. To do this, go to the Settings app and tap on “Control Center”. Then, scroll down and find “Screen Recording” under the “More Controls” section. Tap on the green plus sign next to it to add it to your Control Center.
Step 2: Access Control Center
To access the Control Center, swipe down from the top right corner of your iPhone’s screen (or from the bottom for older models). You will see a list of shortcuts and options, including the screen recording button.
Step 3: Customize Screen Recording Options (Optional)
Before you start recording, you can customize some options for your screen recording. This includes choosing to record audio from the microphone, enabling or disabling the microphone button in the Control Center, and choosing the video quality. To do this, long-press on the screen recording button in the Control Center, and you will see these options.
Step 4: Start Recording
To start recording, tap on the screen recording button in the Control Center. A three-second countdown will appear, giving you time to go to the screen you want to record. You will see a red bar at the top of your screen, indicating that the recording is in progress.
Step 5: Stop Recording
To stop recording, tap on the red bar at the top of your screen and select “Stop”. You can also access the Control Center and tap on the screen recording button again to stop it.
Step 6: Save Your Recording
After you stop recording, your video will automatically be saved to your Photos app. You can access it by going to the “Recents” album. From there, you can edit, share, or delete your recording.
Step 7: Edit Your Recording (Optional)
If you want to edit your recording, you can do so directly in the Photos app. You can trim the video, add filters, and even add text or drawings.
Step 8: Share Your Recording
To share your recording, go to the video in your Photos app and tap on the share button. From there, you can choose to share it via messages, email, social media, or any other compatible app.
Step 9: Use Screen Recording in Different Apps
You can use the screen recording feature in various apps, including games, social media, and video streaming apps. To do this, simply access the Control Center and start recording while you are in the app.
Congratulations, you have now mastered screen recording on your iPhone! With this feature, you can easily create and share videos of your screen activity. Practice using it in different apps to get comfortable with the process. Happy recording!
Capture Your iPhone Screen: A Beginner’s Guide to Recording
The iPhone is a powerful device that allows you to do a variety of tasks, from making calls and sending messages to browsing the internet and playing games. One of its useful features is the ability to capture your screen, which can come in handy in many situations. Whether you want to show a friend how to use an app or save a funny conversation, recording your iPhone screen is a simple and effective way to do so. In this beginner’s guide, we will walk you through the steps of capturing your iPhone screen.
Step 1: Enable Screen Recording
Before you can start recording your screen, you need to enable the screen recording feature on your iPhone. To do this, go to your iPhone’s Settings, then Control Center, and tap on Customize Controls. From the list of available controls, find Screen Recording and tap on the green plus button next to it. This will add the Screen Recording button to your Control Center.
Step 2: Access Control Center
To access the Control Center, swipe down from the top right corner of your iPhone’s screen. If you have an iPhone X or newer model, swipe down from the top right corner of the screen. If you have an older model, swipe up from the bottom of the screen. Once you have opened the Control Center, you will see the Screen Recording button.
Step 3: Start Recording
To start recording your iPhone screen, simply tap on the Screen Recording button. A three-second countdown will appear, giving you time to navigate to the screen you want to record. Once the countdown is over, your screen recording will begin. A red bar at the top of your screen will indicate that the recording is in progress.
Step 4: Stop Recording
To stop recording your screen, tap on the red bar at the top of your screen and select Stop. Alternatively, you can also access the Control Center and tap on the Screen Recording button again to stop the recording. Your screen recording will automatically save to your Photos app.
Step 5: Edit and Share
After you have stopped the recording, you can access it in your Photos app. From there, you can edit the recording by trimming the beginning or end, adding text or drawings, and even adding background music. Once you are satisfied with the editing, you can share the recording with others through messages, email, or social media.
Additional Tips:
– Make sure to inform anyone you are recording before starting.
– To include audio in your recording, press and hold the Screen Recording button, then tap on the microphone icon to turn on audio recording.
– You can also use screen recording to capture your FaceTime or Skype calls.
– If you want to record your screen without the red bar at the top, you can turn off the recording indicator in your Control Center settings.
In conclusion, capturing your iPhone screen is a simple and useful feature that can come in handy in many situations. By following these easy steps, you can record and share your screen with others, making it easier to explain or showcase certain tasks or conversations. With practice, you can become a pro at capturing your iPhone screen and use it to its full potential.In conclusion, knowing how to screen record on iPhone can greatly enhance your productivity and communication. With the simple steps outlined above, you can easily capture and save important information, share it with others, and improve your overall digital experience. So why wait? Start utilizing this useful feature on your iPhone today and take your device usage to the next level. Happy recording!
