image source: https://wccftech.com
Welcome to our guide on how to put your iPhone in night mode! With the increasing awareness about the negative impacts of blue light on our eyes, more and more people are looking for ways to reduce their exposure to it. The night mode feature on iPhones is a great solution for this problem, as it filters out the blue light and provides a warmer and more comfortable viewing experience. In this article, we will walk you through the step-by-step process of enabling and using night mode on your iPhone. So, let’s get started and learn how to put your iPhone in night mode!
Step-by-Step Guide: How to Put Your iPhone in Night Mode
Introduction
Night mode, also known as dark mode, is a feature on iPhones that changes the appearance of the screen to a darker color scheme. This mode is designed to reduce eye strain and make it easier to use your phone in low light settings. If you find yourself using your iPhone at night or in dark environments, you may want to consider using night mode. In this guide, we will walk you through the steps to enable night mode on your iPhone.
Step 1: Open Settings
The first step to putting your iPhone in night mode is to open the Settings app. This can be found on your home screen, represented by a gear icon.
Step 2: Tap on Display & Brightness
Once you have opened the Settings app, scroll down and tap on “Display & Brightness.”
Step 3: Enable Dark Mode
In the Display & Brightness menu, you will see an option for “Dark Mode.” Tap on this to enable it. You can also set a schedule for dark mode to automatically turn on and off at certain times.
Step 4: Adjust Brightness
If you find that the screen is still too bright in night mode, you can adjust the brightness by using the slider at the bottom of the screen. This will allow you to find the perfect level of brightness for your needs.
Step 5: Use Night Shift
Another option for reducing eye strain at night is to use Night Shift. This feature changes the color temperature of your screen to a warmer tone, which can be easier on the eyes. To enable Night Shift, go back to the Display & Brightness menu and tap on “Night Shift.” From here, you can schedule Night Shift to turn on and off at specific times or manually turn it on and adjust the color temperature.
Step 6: Adjust True Tone
True Tone is a feature that automatically adjusts the color and intensity of your screen based on your surroundings. This can also be helpful in reducing eye strain. To adjust True Tone, go back to the Display & Brightness menu and tap on “True Tone.” From here, you can toggle the feature on and off or adjust the intensity.
Step 7: Use Accessibility Settings
If you have difficulty seeing your phone in low light, you can also adjust the accessibility settings to make it easier to use. In the Settings app, go to “Accessibility” and tap on “Display & Text Size.” From here, you can enable “Smart Invert” or “Classic Invert,” which will change the color scheme of your screen to a darker version.
Conclusion
Enabling night mode on your iPhone can make it easier and more comfortable to use your phone in low light settings. By following these steps, you can customize your night mode experience to best suit your needs. Remember to also take breaks and limit screen time to further protect your eyes.
Mastering Night Mode on Your iPhone: Simple Steps to Follow
Night mode is a feature on your iPhone that allows you to take better photos in low light situations. It automatically adjusts the exposure and color balance to create a brighter and clearer image. If you often find yourself taking photos at night or in dimly lit areas, mastering night mode can greatly improve the quality of your photos. In this guide, we will walk you through the simple steps to follow to make the most out of this feature on your iPhone.
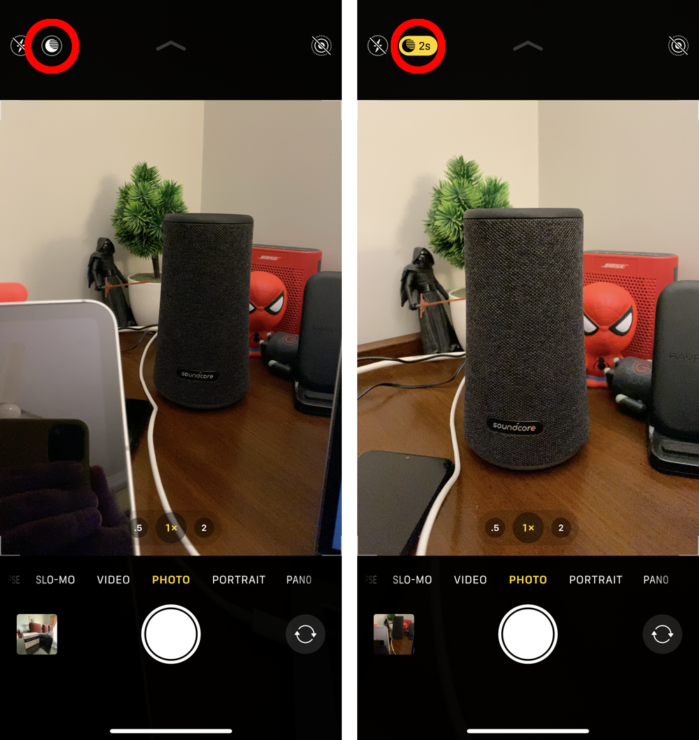
Step 1: Access Night Mode
To start using night mode, open the camera app on your iPhone. If you have an iPhone 11 or later, the night mode icon will automatically appear in the top left corner of your screen when the camera detects low light. For older iPhone models, you can access night mode by tapping on the moon icon on the top left corner.
Step 2: Choose the Right Subject
Night mode works best for still subjects such as landscapes, buildings, and portraits. Moving objects or people may appear blurry in night mode photos, so it’s important to keep your subject as still as possible. If you’re taking a photo of a person, ask them to hold still for a few seconds until the photo is captured.
Step 3: Keep Your Phone Steady
Since night mode takes multiple shots and combines them to create a brighter image, it’s crucial to keep your phone as steady as possible. Any movement can result in a blurry photo. You can use a tripod or prop your phone on a stable surface to avoid shakiness.
Step 4: Experiment with Exposure Time
Night mode automatically sets the exposure time, but you can also adjust it manually. Swipe left or right on the screen to increase or decrease the exposure time. Longer exposure time results in brighter photos, but it also increases the chance of blur. Play around with different exposure times to find the perfect balance for your photo.
Step 5: Avoid Using Flash
Using the flash in night mode can create harsh and unnatural lighting in your photos. It’s best to rely on the night mode feature instead of using flash.
Step 6: Edit Your Photos
After capturing your photo in night mode, you can further enhance it by editing it in the Photos app. Adjust the brightness, contrast, and saturation to your liking. You can also use the built-in Night Mode filter to give your photo a more dramatic look.
Step 7: Practice Makes Perfect
As with any skill, mastering night mode takes practice. Don’t get discouraged if your first few attempts don’t turn out as expected. Keep experimenting with different settings and subjects to find what works best for you.
In conclusion, night mode on your iPhone is a powerful feature that can greatly improve your low light photos. By following these simple steps and practicing, you’ll be able to capture stunning night time shots with ease. So next time you’re out and about in the dark, don’t hesitate to use night mode and see the difference it makes in your photography.
Night Mode Made Easy: How to Enable it on Your iPhone
Night mode is a popular feature on the iPhone that allows users to reduce the amount of blue light emitted from their device’s screen. This can be helpful for those who use their iPhone at night, as blue light can disrupt sleep patterns and cause eye strain. In this guide, we will show you how to easily enable night mode on your iPhone.
Step 1: Open Control Center
To enable night mode on your iPhone, start by swiping down from the top right corner of your screen to open Control Center. This is where you can access various settings and features of your iPhone.
Step 2: Locate the Night Shift Icon
In Control Center, you will see a row of icons at the top. The icon you are looking for is a crescent moon with a sun next to it. This is the night shift icon.
Step 3: Enable Night Shift
Tap on the night shift icon to enable it. You will see the icon turn orange, indicating that night mode is now active. You can also adjust the intensity of the night shift by tapping and holding on the icon and sliding your finger left or right.
Step 4: Set a Schedule
If you want, you can also set a schedule for night mode to automatically turn on and off at specific times. To do this, go to Settings > Display & Brightness > Night Shift. From here, you can choose to have night shift turn on automatically at sunset and turn off at sunrise, or you can set your own custom schedule.
Step 5: Adjust Color Temperature
You can also adjust the color temperature of night mode to your preference. This can be done by going to Settings > Display & Brightness > Night Shift and sliding the “Color Temperature” slider left or right. This will change the warmth of the screen, with warmer tones being better for your eyes at night.
Step 6: Use Control Center Shortcut
If you prefer, you can also enable night mode directly from the Control Center shortcut. To do this, go to Settings > Control Center > Customize Controls and add “Night Shift” to your list of shortcuts. Now, when you open Control Center, you will see the night shift icon and can easily enable it from there.
In conclusion, enabling night mode on your iPhone is a simple and effective way to reduce eye strain and improve your sleep patterns. By following these easy steps, you can easily access and customize night mode to your liking. Say goodbye to harsh blue light and hello to a more comfortable viewing experience on your iPhone.In conclusion, learning how to put your iPhone in night mode can greatly improve your user experience and reduce eye strain. By following the simple steps outlined in this guide, you can easily activate night mode and enjoy a more comfortable viewing experience on your device. Don’t let bright screens disrupt your sleep, make use of this convenient feature and enjoy a more restful night. Remember to also adjust the settings to your desired preferences to optimize your night mode experience. Keep your eyes and mind at ease with night mode on your iPhone.
Reference
- What Happens When You Put Your iPhone in Do Not Disturb Mode?, https://smallbusiness.chron.com/happens-put-iphone-not-disturb-mode-71152.html
- How to Use Sleep Mode on Your iPhone, https://lifehacker.com/health/how-to-use-sleep-mode-on-iphone
- Northern Lights: How to see them in the UK tonight, https://www.bbc.co.uk/news/uk-68995042
