image source: https://www.timeanddate.com
Welcome to our step-by-step guide on how to make a pinhole projector! Whether you’re looking to safely view a solar eclipse or just curious about the science behind it, making your own pinhole projector is a simple and fun DIY project. In this tutorial, we’ll walk you through the materials and steps needed to create a pinhole projector that will allow you to safely view the sun’s image without damaging your eyes. So let’s get started and learn how to make a pinhole projector!
Step-by-Step Guide: How to Make a Pinhole Projector for Safe Solar Viewing
Introduction
As exciting as a solar eclipse may be, it is important to remember that looking directly at the sun can cause serious damage to your eyes. That’s why it’s crucial to use proper equipment for safe solar viewing. One easy and inexpensive way to do this is by making a pinhole projector. In this guide, we will provide step-by-step instructions on how to make a pinhole projector for safe solar viewing.
Materials Needed:
– A cardboard box (can be any size, but a shoebox works well)
– Aluminum foil
– A pin or needle
– Scissors
– Tape
– White paper
– Pen or pencil
Step 1: Prepare the Box
Start by cutting a small square or rectangle in one of the short sides of the cardboard box. This will serve as the viewing window for your projector. Make sure the hole is big enough to fit your paper and small enough to control the amount of light entering the box.
Step 2: Cover the Window with Foil
Cut a piece of aluminum foil that is slightly bigger than the window you just made. Use tape to secure the foil over the window, making sure it is smooth and without any wrinkles or holes.
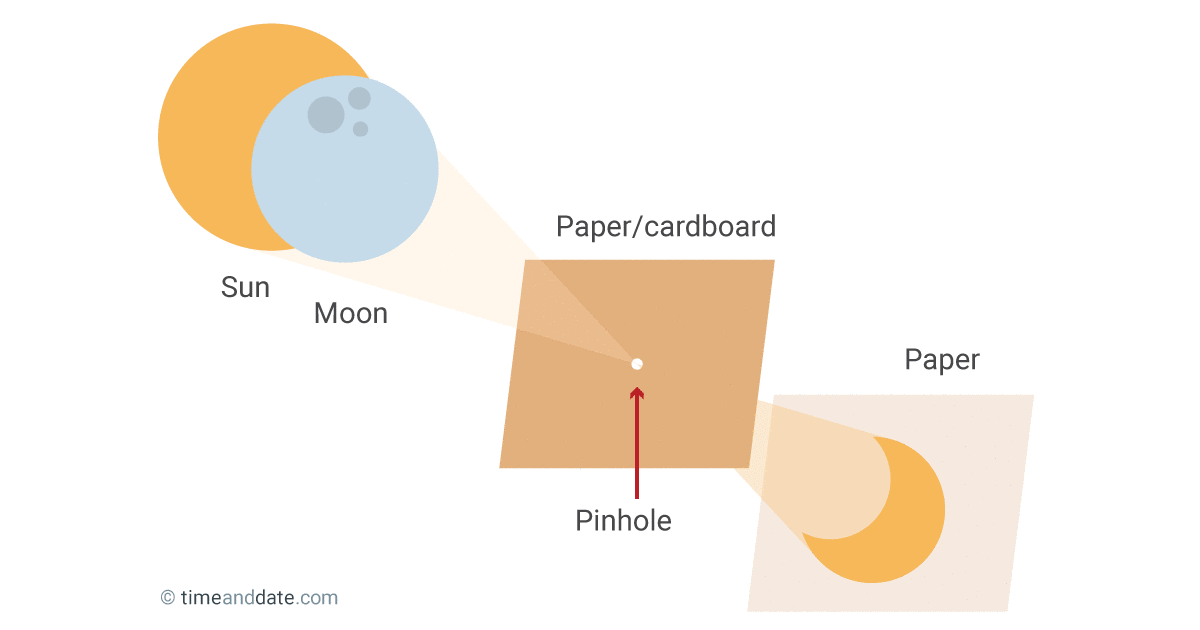
Step 3: Create the Pinhole
Using your pin or needle, carefully poke a small hole in the center of the foil. This will act as the lens for your projector, allowing the sun’s rays to enter and create an image.
Step 4: Prepare the Viewing Area
Place a piece of white paper inside the box, opposite the pinhole. This is where you will see the projected image of the sun. You may need to adjust the distance between the pinhole and the paper to get a clear image.
Step 5: Test Your Projector
With the box closed, point the pinhole towards the sun and look through the viewing window. You should see a small dot of light on the paper. If the image is not clear, adjust the distance between the pinhole and the paper until you get a sharp image.
Safety Precautions:
– Do not look directly at the sun through the pinhole projector. The image projected onto the paper is safe to view, but looking directly at the sun can cause permanent eye damage.
– Do not leave the pinhole projector unattended while in use. Always make sure to supervise children and keep pets away from the projector.
– Do not use the pinhole projector if the sky is cloudy or if the sun is partially blocked by trees or buildings. You must have a clear view of the sun for the projector to work properly.
Conclusion
Making a pinhole projector is an easy and safe way to view a solar eclipse or any other solar event. With just a few simple materials, you can create a device that allows you to see the sun’s image without harming your eyes. Remember to always take proper precautions when viewing the sun and never look directly at it without proper equipment.
DIY Pinhole Projector Tutorial: How to Safely View the Solar Eclipse
On August 21, 2017, a total solar eclipse will be visible from certain areas in the United States. This rare event occurs when the moon passes between the Earth and the sun, casting a shadow on the Earth and blocking out the sun’s light. It is an incredible sight to behold, but it is important to view it safely. Looking directly at the sun, even during an eclipse, can cause permanent eye damage. One way to safely view the eclipse is by using a DIY pinhole projector. In this tutorial, we will guide you through the steps of making your own pinhole projector to view the solar eclipse.
Materials:
– A long cardboard box (at least 2 feet in length)
– Aluminum foil
– Tape
– Scissors
– A pin or needle
– White paper
– Pen or marker
– A ruler
Step 1: Prepare the box
Take your cardboard box and cut off one of the shorter sides, leaving a rectangle-shaped opening. This will be the viewing area for your projector. Next, cut a piece of aluminum foil that is slightly larger than the opening of the box and tape it securely over the opening.
Step 2: Make the pinhole
Using your pin or needle, carefully poke a small hole in the center of the aluminum foil. This will act as the lens for your projector.
Step 3: Create the projection surface
On the opposite side of the box, cut another rectangle-shaped opening. This will be where you will place the white paper to view the projection. Use tape to secure the paper over the opening.
Step 4: Measure and mark
Using your ruler, measure and mark a line that is 1 inch from the bottom of the box (the side with the aluminum foil). Then, make another mark 1 inch above the first mark. This will serve as a guide for where to place your pen or marker to trace the projection.
Step 5: Position the box
Find a stable, flat surface to place your projector on. Adjust the angle of the box so that the sun’s rays are shining through the pinhole and onto the projection surface.
Step 6: View the eclipse
Stand behind the box and look through the viewing area. You should see a projection of the sun on the white paper. As the eclipse progresses, you will see the shape of the sun changing as the moon moves in front of it.
Important Safety Tips:
– Never look directly at the sun, even during an eclipse. Always view it through a pinhole projector or with special eclipse glasses.
– Make sure your projector is stable and won’t tip over.
– Do not use the projector if there are any clouds or obstructions blocking the sun.
– Supervise children when using the projector.
Congratulations, you have successfully made your own pinhole projector! Enjoy the solar eclipse safely and be sure to share this experience with others. Remember, never look directly at the sun and use caution when viewing the eclipse. Happy viewing!
Unlock the Secret to Making a Pinhole Projector for Viewing the Solar Eclipse
As the highly anticipated solar eclipse approaches, many people are wondering how they can safely view this rare celestial event. While special glasses and filters are recommended for direct viewing of the eclipse, another option is to make a pinhole projector. This simple and inexpensive tool allows you to safely view the eclipse without risking damage to your eyes. In this guide, we will unlock the secret to making a pinhole projector so you can enjoy the eclipse in all its glory.
Materials:
– A large cardboard box (at least 12 inches in length)
– Aluminum foil
– A pin or needle
– Scissors
– Tape
– White paper
– Optional: ruler, pencil, and black construction paper
Step 1: Prepare the Box
Choose a cardboard box that is at least 12 inches in length. You can use a shoebox, cereal box, or any other similar sized box. Cut off one of the shorter sides of the box so that you have an open end.
Step 2: Make a Hole in the Box
Take the piece of aluminum foil and cover the open end of the box. Use tape to secure it in place. With the pin or needle, make a small hole in the center of the foil. This will act as your lens to project the image of the eclipse.
Step 3: Create the Projection Surface
On the opposite side of the box, cut a square or rectangle about 2 inches in size. This will be your projection surface. Cover the hole with a piece of white paper and secure it with tape. If you want a more defined image, you can also cover the hole with a piece of black construction paper.
Step 4: Project the Image
With the sun behind you, hold the box up so that the aluminum foil is facing the sun. Adjust the angle of the box until you see a small projection of the sun on the white paper. The image may be small at first, but you can move the box closer or further away from the projection surface to adjust the size.
Step 5: Watch the Eclipse
As the moon moves in front of the sun during the eclipse, the image on the projection surface will also change. You will be able to see the moon slowly covering and uncovering the sun. It’s important to note that the image will be upside down, but this is normal and expected with a pinhole projector.
Tips and Safety Precautions:
– Never look directly at the sun without proper eye protection. Even with a pinhole projector, it’s important to protect your eyes from the sun’s harmful rays.
– Make sure the hole in the aluminum foil is small and sharp for the clearest image.
– You can also use a small plastic or cardboard tube instead of a box to create a handheld pinhole projector.
– If you want to share the experience with others, you can make multiple pinhole projectors and have everyone watch the eclipse together.
Now that you know the secret to making a pinhole projector, you can safely view the solar eclipse and witness this incredible natural phenomenon. So gather your materials and get ready to experience the wonder of the celestial world. Remember to always take precautions and enjoy the eclipse responsibly. Happy viewing!In conclusion, learning how to make a pinhole projector is a simple and budget-friendly way to view the upcoming solar eclipse. With just a few materials, you can create your own projector and safely observe this rare event. Follow the steps outlined above and you’ll be on your way to experiencing the wonder of a solar eclipse. Happy projecting!
