Welcome to our guide on how to delete your Facebook account. Whether you’re looking to take a break from social media, protect your privacy, or simply move on from the platform, we’ve got you covered. In this comprehensive tutorial, we will walk you through the step-by-step process of permanently deleting your Facebook account. Follow our easy instructions and say goodbye to Facebook for good.
How to Permanently Delete Your Facebook Account in a Few Simple Steps
Facebook has become a popular platform for connecting with friends and family, sharing photos and updates, and staying updated on current events. However, there may come a time when you no longer wish to have a Facebook account. Whether you’re concerned about privacy, tired of the constant notifications, or simply want a break from social media, permanently deleting your Facebook account is a simple process. In this guide, we will walk you through the steps to permanently delete your Facebook account.
Step 1: Backup Your Data
Before you delete your Facebook account, it’s important to download a copy of your data. This includes your photos, videos, and posts. To do this, go to the Settings menu on your Facebook account. From there, click “Your Facebook Information” and then “Download Your Information.” You can choose which data you want to download and the format in which you want to receive it. Once you’ve made your selections, click “Create File” and wait for the download to complete.
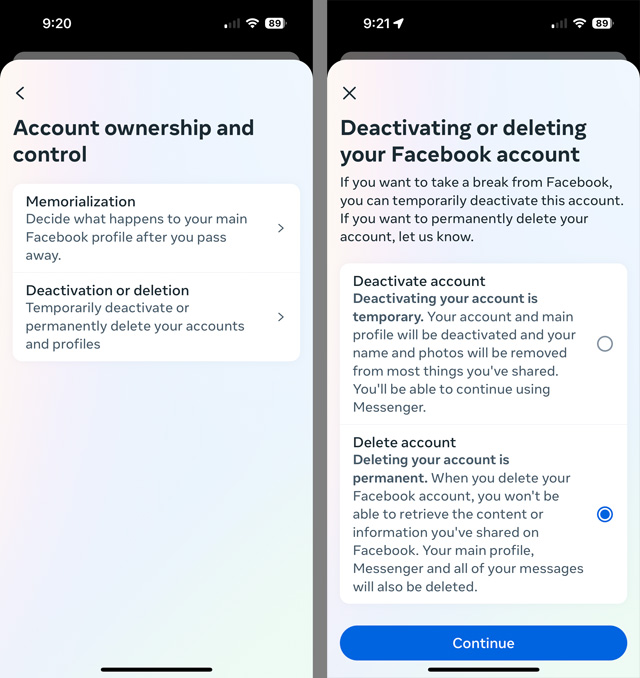
Step 2: Deactivate Your Account
If you’re unsure about permanently deleting your account, you can first deactivate it. This will make your account invisible to others, but you can reactivate it at any time by simply logging back in. To deactivate your account, go to the Settings menu and click “Your Facebook Information.” From there, click “Deactivation and Deletion” and select “Deactivate Account.” Follow the prompts to confirm your decision.
Step 3: Permanently Delete Your Account
If you’re sure you want to permanently delete your Facebook account, follow these steps. First, go to the Facebook Help Center and search for “Delete Account.” Click on the first result, which will bring you to the Account Deletion page. From there, click “Let Us Know” and follow the prompts to confirm your decision. Keep in mind that once you delete your account, you will not be able to reactivate it or retrieve any of your data.
Step 4: Clear Your Browsing History
After you have permanently deleted your account, it’s a good idea to clear your browsing history. This will remove any traces of your Facebook activity from your device. To do this, go to your browser’s settings and select “Clear Browsing Data.” Make sure to select “Cookies and Other Site Data” and “Cached Images and Files” before clicking “Clear Data.”
Step 5: Inform Your Contacts
Before you delete your account, it’s considerate to inform your contacts. You can do this by sending a message or posting a status update to let them know that you will no longer be active on Facebook. This will give them the opportunity to stay in touch through other means if they wish.
In conclusion, permanently deleting your Facebook account is a simple process that can be done in just a few steps. Remember to backup your data, deactivate your account if you’re unsure, and clear your browsing history after deletion. By following these steps, you can say goodbye to Facebook and focus on other aspects of your life.In conclusion, knowing how to delete your Facebook account is a crucial step in protecting your online privacy and managing your digital footprint. By following the steps outlined above, you can easily deactivate or permanently delete your account. Keep in mind that this process is irreversible, so make sure to carefully consider your decision before proceeding. We hope this guide has been helpful in navigating the process of deleting your Facebook account. Remember to also review any other social media accounts you may have and take necessary steps to protect your personal information.
