Taking a screenshot on your laptop is a simple and useful skill to have. Whether you want to capture a funny meme, save important information, or show someone a specific image, knowing how to take a screenshot can come in handy in various situations. In this guide, we will walk you through the step-by-step process of taking a screenshot on your laptop, so you can master this task and use it whenever needed. Follow these easy instructions and you’ll be a screenshot pro in no time!
Step-by-Step Guide: How to Take Screenshot in Laptop Easily
Taking a screenshot on your laptop can be a useful tool for many purposes, such as capturing an important moment, saving important information, or troubleshooting technical issues. Fortunately, it is a simple process that can be done using the built-in tools on your laptop. In this guide, we will walk you through the step-by-step process of taking a screenshot on your laptop.
Step 1: Determine the Type of Screenshot You Want to Take
The first step in taking a screenshot on your laptop is to decide what type of screenshot you want to capture. There are three main types of screenshots: full screen, active window, and custom selection. A full screen screenshot captures everything that is currently displayed on your laptop screen, while an active window screenshot captures only the currently selected window. A custom selection screenshot allows you to choose a specific area on your screen to capture.
Step 2: Use the Built-In Screenshot Tool
Most laptops come with a built-in screenshot tool that makes it easy to take screenshots. For Windows laptops, the default tool is called “Snipping Tool” and can be found by searching for it in the Start menu. For Mac laptops, the default tool is called “Grab” and can be found in the “Utilities” folder in the Applications folder.
Step 3: Select the Type of Screenshot You Want to Take
Once you have opened the screenshot tool, you can choose the type of screenshot you want to take. For Windows laptops, click on the “New” button in the Snipping Tool and select the type of screenshot you want to take from the drop-down menu. For Mac laptops, select the type of screenshot from the “Capture” menu in the Grab tool.
Step 4: Capture the Screenshot
After selecting the type of screenshot, your cursor will turn into a crosshair. For a full screen screenshot, simply click anywhere on the screen to capture the entire screen. For an active window screenshot, click on the window you want to capture. For a custom selection screenshot, click and drag your cursor to select the specific area you want to capture.
Step 5: Save the Screenshot
Once you have captured the screenshot, it will automatically open in the screenshot tool. From there, you can annotate the screenshot, save it to your preferred location, and give it a name. You can also use keyboard shortcuts to quickly save your screenshot. For Windows laptops, press the “Windows” key + “PrtScn” to save the screenshot to your Pictures folder. For Mac laptops, press “Command” + “Shift” + “3” to save the screenshot to your desktop.
Step 6: Use Your Screenshot
Congratulations, you have successfully taken a screenshot on your laptop! You can now use your screenshot for whatever purpose you intended, whether it is to share it with others, save important information, or troubleshoot technical issues.
In conclusion, taking a screenshot on your laptop is a simple process that can be done using the built-in tools on your laptop. By following this step-by-step guide, you can easily capture and save screenshots for various purposes.
Mastering the Art of Taking Screenshots in Laptops: A Beginner’s Guide
Screenshots are an essential aspect of using a laptop, whether for personal or professional purposes. They allow us to capture and save what we see on our screens, making it easier to share information, troubleshoot issues, and remember important details. However, taking screenshots can be a daunting task for beginners, especially with the various operating systems and laptop brands available in the market. In this guide, we will discuss the basic steps to master the art of taking screenshots in laptops, so you can effortlessly capture and save any important information on your screen.
Step 1: Know your laptop’s operating system
The first step in taking screenshots on your laptop is to understand its operating system. The most common operating systems for laptops are Windows, macOS, and Chrome OS. Each of these systems has different methods for taking screenshots, so it is crucial to know which one your laptop is using.
Step 2: Familiarize yourself with the keyboard shortcuts
The easiest and most efficient way to take screenshots on a laptop is by using keyboard shortcuts. These are key combinations that will instantly capture and save your screen as an image. For Windows laptops, the most common shortcut is “Windows + PrtScn” or “Windows + Shift + S.” On macOS, it is “Command + Shift + 3” for a full-screen screenshot and “Command + Shift + 4” for a specific area. Chrome OS laptops have a dedicated “Show All Windows” key (a square icon with two lines on the bottom) that can be used to take a screenshot of the entire screen.
Step 3: Use the Snipping Tool or Grab
If your laptop does not have a dedicated screenshot key or you prefer a more customizable approach, you can use the Snipping Tool on Windows or Grab on macOS. These tools allow you to select a specific area of your screen to capture and save as an image. They also have features such as freehand drawing and highlighting to enhance your screenshots.
Step 4: Explore third-party screenshot software
There are also various third-party software options available for taking screenshots, such as Lightshot, Snagit, and Greenshot. These programs offer advanced features like scrolling screenshots, multiple capture modes, and cloud storage options. However, they may come at a cost or have limited free versions.
Step 5: Save and edit your screenshots
Once you have captured your desired screenshot, it is essential to save it in a place where you can easily access it. Most laptops will automatically save your screenshots in a designated folder, but you can also choose where to save them. Additionally, you can use basic image editing tools like Paint or Preview to crop, resize, or add annotations to your screenshots.
Step 6: Troubleshoot common issues
If you encounter any issues while taking screenshots, there are a few troubleshooting tips you can try. First, make sure you are using the correct keyboard shortcut for your laptop’s operating system. If that does not work, try restarting your laptop or updating your operating system. If the issue persists, you may need to seek technical support.
In conclusion, taking screenshots on a laptop may seem intimidating at first, but with the right knowledge and tools, it can become second nature. Remember to familiarize yourself with your laptop’s operating system, use keyboard shortcuts, and explore third-party software for advanced features. With these tips, you can easily capture and save any important information on your screen.
Capture Your Screen: A Comprehensive Tutorial on How to Take Screenshot in Laptop
Capturing your laptop screen is a useful skill to have, whether you need to save an important document, create a tutorial, or simply want to share a funny meme. Taking a screenshot is a quick and easy way to capture exactly what is on your screen at that moment. In this comprehensive tutorial, we will guide you through the different methods and tools available for taking screenshots on your laptop. So let’s get started!
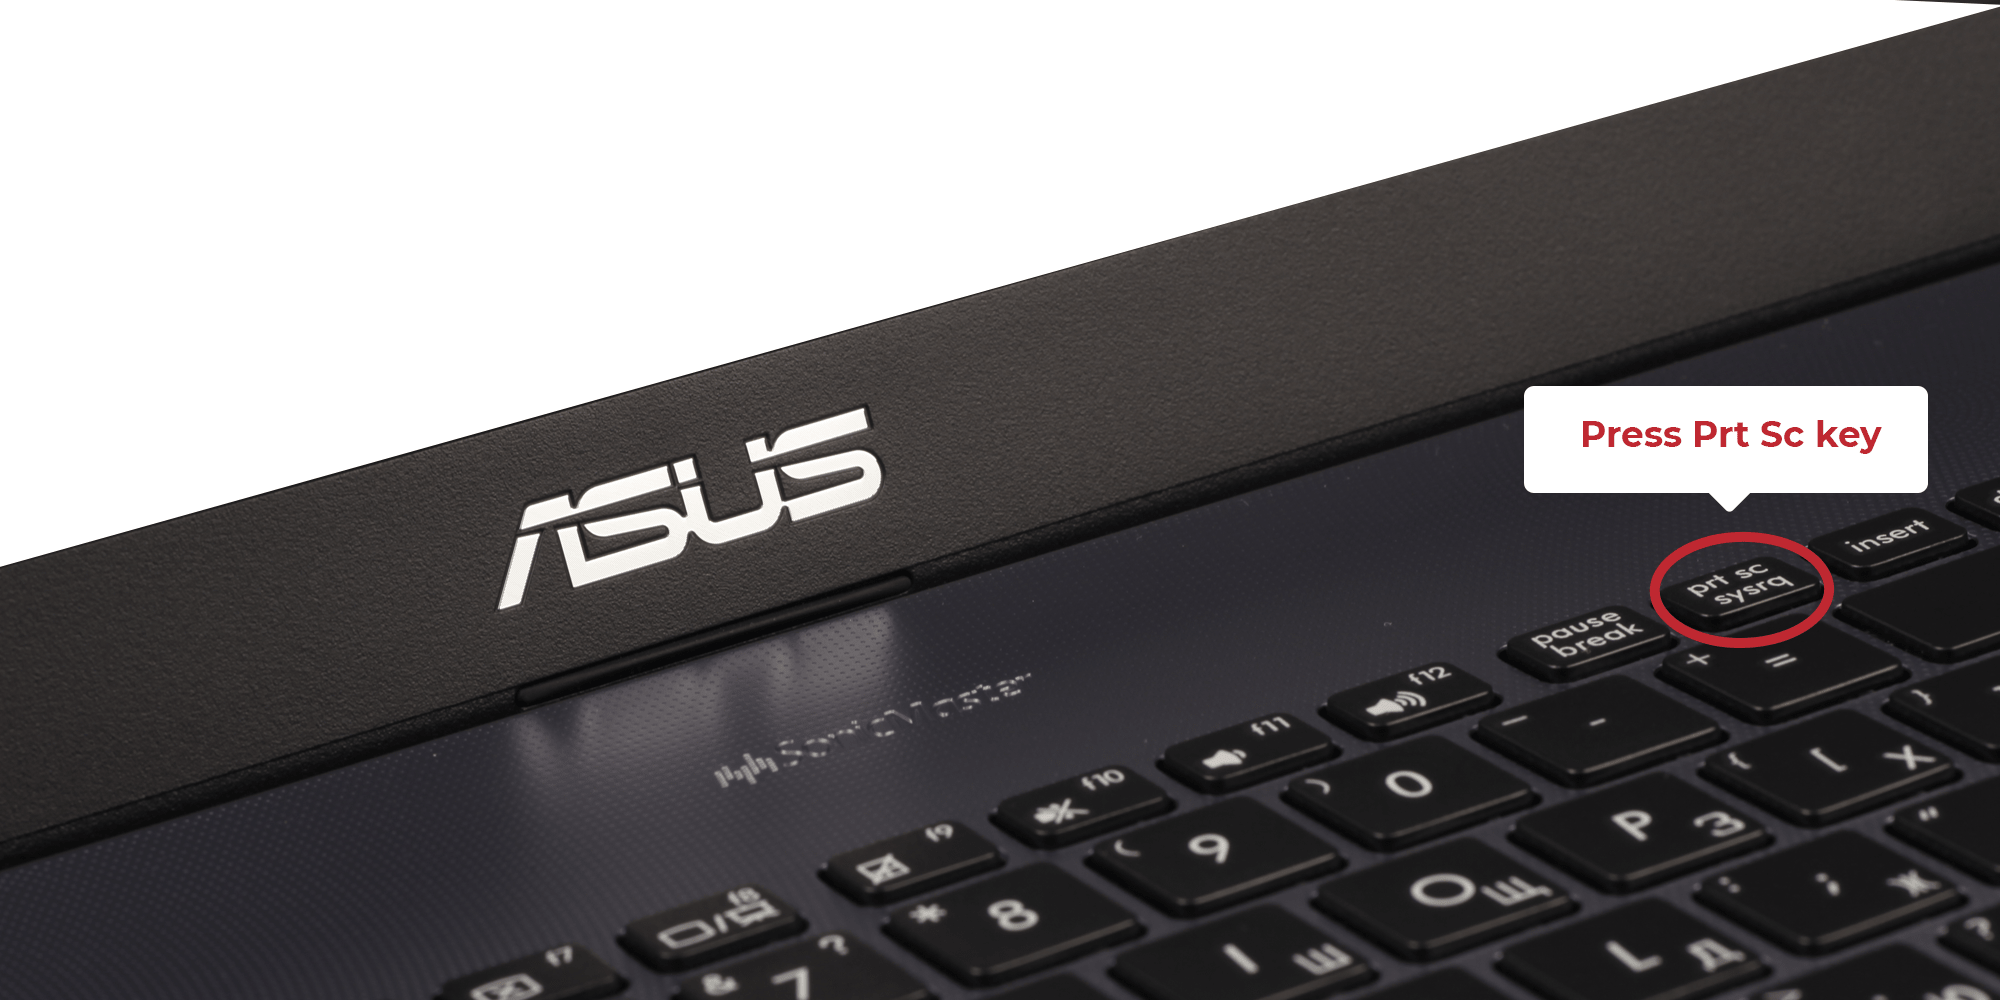
Method 1: Using the Print Screen Key
The most common method for taking a screenshot on a laptop is by using the Print Screen key. This key is usually located in the top row of your keyboard, labeled as “PrtScn”, “PrtSc”, or “Print Screen”. Here’s how to use it:
1. Make sure the screen you want to capture is open and visible on your laptop.
2. Press the “Print Screen” key once. This will capture your entire screen, including all open windows and the taskbar.
3. Open an image editing program, such as Microsoft Paint or Photoshop, and press “Ctrl + V” or right-click and select “Paste” to paste the screenshot.
4. Save the image in your desired format, such as JPEG or PNG.
Method 2: Using the Windows Snipping Tool
If you want more control over what part of your screen to capture, you can use the built-in Snipping Tool in Windows. Here’s how:
1. Type “Snipping Tool” in the search bar and open the application.
2. Click on “New” and select the type of snip you want to take – Free-form, Rectangular, Window, or Full-screen.
3. Use your mouse to select the area you want to capture.
4. Once the snip is taken, you can edit and save it using the tools provided.
Method 3: Using Third-Party Software
There are also many third-party software options available for taking screenshots on your laptop. Some popular choices include Lightshot, Greenshot, and Snagit. These tools offer more advanced features and editing options than the built-in methods. You can download these programs for free or purchase a premium version for additional features.
Tips for Taking High-Quality Screenshots
1. Make sure your screen is clean and free of any smudges or dust, as these can show up in the screenshot.
2. Use the zoom function on your laptop to capture small details or text.
3. If you are taking a screenshot of a webpage, use the “Full Page” option in the Snipping Tool to capture the entire webpage.
4. To avoid capturing your cursor in the screenshot, move it to the edge of the screen before taking the screenshot.
5. Use the shortcut “Alt + Print Screen” to capture only the active window instead of the entire screen.
6. Experiment with different methods and tools to find the one that works best for you.
Conclusion
Taking screenshots on your laptop is a simple yet useful skill that can come in handy in many situations. Whether you prefer the traditional Print Screen key or want more control with third-party software, now you have the knowledge to capture your screen with ease. So next time you need to save a picture, document, or anything else on your screen, you know what to do. Happy screenshotting!In conclusion, knowing how to take a screenshot in a laptop is a useful skill that can greatly enhance your productivity and communication. By following the steps outlined in this guide, you can easily capture and save important information for future reference. Remember to use the appropriate keyboard shortcuts or built-in tools to take screenshots in your specific laptop model. With this knowledge, you can confidently navigate any task that requires a screenshot and optimize your online presence.
